Ansible is a popular and powerful IT automation tool that can help you manage your infrastructure and applications more efficiently and reliably. Whether you want to configure systems, deploy software, orchestrate workflows, or automate tasks, Ansible can help you achieve your automation goals with simplicity and ease of use. In this blog, we will introduce you to the basics of Ansible and show you how to get started with it.
What is Ansible?
Ansible is an open source, command-line IT automation software application written in Python. It can configure systems, deploy software, and orchestrate advanced workflows to support application deployment, system updates, and more. Ansible’s main strengths are simplicity and ease of use.
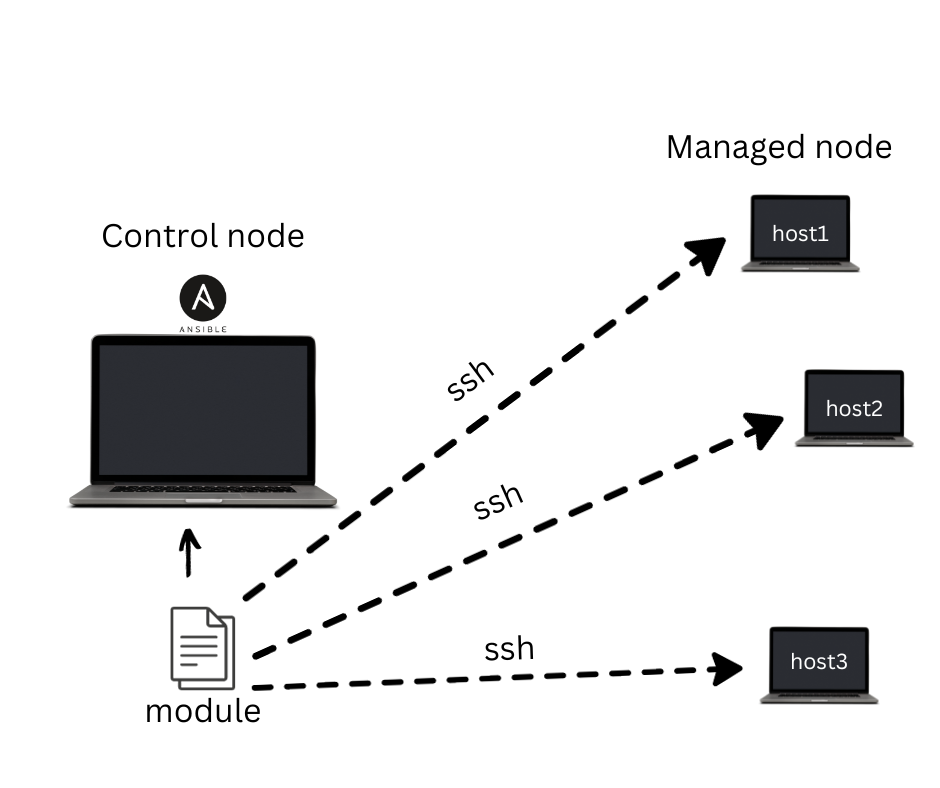
Ansible works by connecting to your nodes (the machines or devices that you want to manage) and running small programs called modules on them. Modules are the units of work that Ansible executes. Each module has a specific function, such as installing a package, creating a user, or copying a file. Ansible ships with hundreds of modules that cover a wide range of tasks and scenarios. You can also write your own custom modules or use modules from other sources.

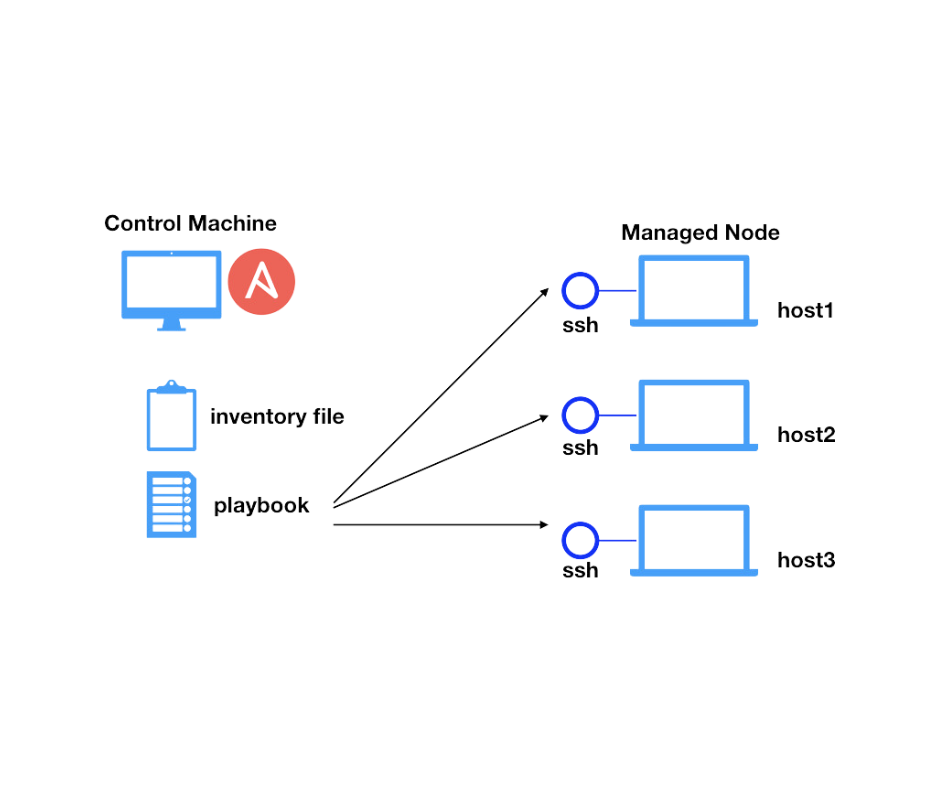
Ansible executes modules through playbooks, which are YAML files that define what actions to take on which nodes. Playbooks are human-readable and easy to write. They allow you to describe your automation tasks in a declarative way, meaning that you specify the desired state of your system, not the steps to achieve it. Ansible then figures out how to make that state happen.
Ansible does not require any agents or daemons to be installed on your nodes. It only needs SSH access and Python installed on them. This makes Ansible lightweight, secure, and easy to set up.

Why Use Ansible?
- Agentless: Unlike some other automation tools, Ansible is agentless. This means you don’t need to install agents on target systems, reducing complexity and security risks.
- Simplicity: Ansible playbooks are written in YAML, a straightforward and human-readable format. This makes it easy to understand and work with.
- Scalability: You can use Ansible to manage a few servers or thousands. Its simplicity doesn’t limit its scalability.
- Efficiency: Automating tasks with Ansible can significantly reduce the time spent on manual configurations and deployments.
- Community and Integration: Ansible boasts a vast community and extensive integration with other tools and platforms.
How to install Ansible?
Ansible can be installed on various operating systems, such as Linux, macOS, Windows, FreeBSD, etc. The installation methods may vary depending on the OS and the Ansible version you want to use.
On Linux Systems (Ubuntu/Debian)
For example, if you want to install Ansible on Ubuntu 20.04 LTS, you can use the following commands:
# Update the system sudo apt update sudo apt upgrade

# Install software-properties-commonsudo apt install software-properties-common
# Add Ansible PPA repositorysudo add-apt-repository –yes –update ppa:ansible/ansible

# Install Ansible sudo apt install ansible
To verify that Ansible is installed correctly, you can run the following command:
ansible –version
You should see something like this:
ansible 2.10.9 config file = /etc/ansible/ansible.cfg configured module search path = [‘/home/user/.ansible/plugins/modules’,
 ‘/usr/share/ansible/plugins/modules’]
ansible python module location = /usr/lib/python3/dist-packages/ansible
executable location = /usr/bin/ansible python version = 3.8.10 (default, Jun 2 2021, 10:49:15) [GCC 9.4.0]
On macOS
- For MacOs users, you can install Ansible using Homebrew, a package manager for macOS.
shell/bin/bash -c “$(curl -fsSL https://raw.githubusercontent.com/Homebrew/install/master/install.sh)”
- Once Homebrew is installed, use it to install Ansible:
shellbrew install ansible
On Windows
While Windows is not typically used for Ansible control nodes, but still for Windows users you can run Ansible within the Windows Subsystem for Linux (WSL) to install Ansible and work with it. Follow these steps:
- Install WSL if you haven’t already. You can find instructions here.
- Once WSL is installed, open your Linux distribution and follow the Linux instructions for Ansible installation.
How to use Ansible?
To use Ansible, you need to have at least one control node and one or more managed nodes. The control node is the machine where you run Ansible commands and playbooks. The managed nodes are the machines or devices that you want to automate with Ansible.
The first step to use Ansible is to create an inventory file that lists all your managed nodes and their connection details. The inventory file can be in INI or YAML format. You can also use dynamic inventory scripts or plugins to generate inventory data from external sources.
For example, if you have two managed nodes with IP addresses 192.168.0.10 and 192.168.0.11, you can create a simple inventory file in INI format like this:
[all]
node1 ansible_host=192.168.0.10 ansible_user=user1 ansible_ssh_pass=pass1
node2 ansible_host=192.168.0.11 ansible_user=user2 ansible_ssh_pass=pass2
The inventory file defines a group called all that contains two hosts: node1 and node2. Each host has some variables that specify the host name (ansible_host), the user name (ansible_user), and the password (ansible_ssh_pass) for SSH connection.
You can save the inventory file as inventory.ini in your current working directory.
The next step is to test the connectivity between your control node and your managed nodes using the ping module:
ansible all -i inventory.ini -m ping
The command above tells Ansible to run the ping module on all hosts (all) in the inventory file (inventory.ini). The output should look something like this:
node1 | SUCCESS => {
   “changed”: false,
   “ping”: “pong”
}
node2 | SUCCESS => {
   “changed”: false,
   “ping”: “pong”
}
The output shows that Ansible was able to connect to both nodes and received a pong response from them.
The final step is to create and run a playbook that defines your automation tasks. A playbook is a YAML file that consists of one or more plays. A play is a set of tasks that are executed on a group of hosts. A task is a call to an Ansible module with some parameters.
For example, if you want to install Apache web server on both nodes, you can create a playbook like this:
—
– name: Install Apache web server
hosts: all
tasks:
   – name: Install apache2 package
   apt:
      name: apache2
      state: present
      update_cache: yes
    become: yes
The playbook above defines a play with the name Install Apache web server that applies to all hosts (all). The play has one task with the name Install apache2 package that uses the apt module to install the apache2 package on the nodes. The task also uses the become directive to run the command as root.
You can save the playbook as playbook.yml in your current working directory.
To run the playbook, you can use the following command:
ansible-playbook -i inventory.ini playbook.yml
The command above tells Ansible to run the playbook (playbook.yml) using the inventory file (inventory.ini). The output should look something like this:
PLAY [Install Apache web server] ***********************************************

TASK [Gathering Facts] *********************************************************
ok: [node1]
ok: [node2]

TASK [Install apache2 package] *************************************************
changed: [node1]
changed: [node2]

PLAY RECAP *********************************************************************
node1                   : ok=2   changed=1   unreachable=0   failed=0   skipped=0
rescued=0    ignored=0
node2                   : ok=2   changed=1   unreachable=0   failed=0   skipped=0
rescued=0    ignored=0
The output shows that Ansible gathered some facts about the nodes, installed the apache2 package on them, and reported the results. You can verify that Apache web server is running on the nodes by visiting their IP addresses in your browser.
Conclusion
Ansible is a simple and powerful IT automation tool that can help you manage your infrastructure and applications more efficiently and reliably. In this blog, we have introduced you to the basics of Ansible and showed you how to get started with it. We hope you have enjoyed this tutorial and learned something new. If you want to learn more about Ansible, you can visit the official Ansible documentation or join the Ansible community.


