
Welcome back to our journey into Kubernetes! In the previous blogpost, we delved into the fundamentals of Kubernetes, exploring its architecture, components, alongside a case study where I have shown you what challenges do we face without container orchestration in a microservice based architecture and then we unraveled the container orchestration using Kubernetes and solved the problem. At the end we have also set up Minikube cluster locally on our machine.
In this blogpost, we’ll continue our exploration, we’ll dive into the core components like pods to replicasets to deployments to networking and services that make Kubernetes the powerhouse of container orchestration. We will not confine ourselves to local setup only using minikube but we’ll explore how k8s seamlessly integrates with major cloud providers such as AWS, Azure, and Google Cloud. We will discuss the advantages of deploying Kubernetes in the cloud and how it aligns with modern cloud-native practices.
Prerequisites :
Before we head into understanding the 1st topic i.e. pods , I would like to assume that the following have been setup already.
![]() At this point I assume that either your own application is developed and built into docker images and is available on a docker repository like dockerhub. So k8s can pull it down. Or if you do not have your own custom image , not an issue – kubernetes is not limited to pulling custom applications. You can use any existing images from Docker Hub without building your own. In fact, in this tutorial we’ll pull pre-built images from DockerHub using kubernetes. And that is the most popular use-case.
At this point I assume that either your own application is developed and built into docker images and is available on a docker repository like dockerhub. So k8s can pull it down. Or if you do not have your own custom image , not an issue – kubernetes is not limited to pulling custom applications. You can use any existing images from Docker Hub without building your own. In fact, in this tutorial we’ll pull pre-built images from DockerHub using kubernetes. And that is the most popular use-case.
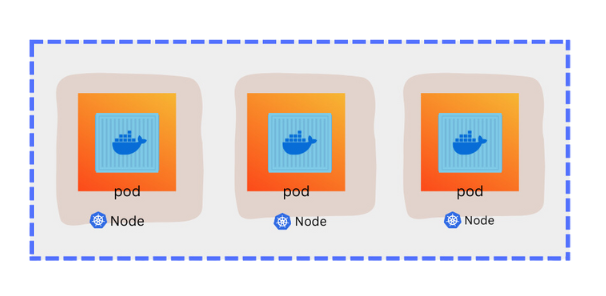
![]() We also assume that the k8s cluster has already been setup and is working. This could be a single node setup or a multi node setup – doesn’t matter. All the services should be in a running state.
We also assume that the k8s cluster has already been setup and is working. This could be a single node setup or a multi node setup – doesn’t matter. All the services should be in a running state.
Pods :
Now let’s discuss pods.
As we discussed in previous tutorial, in kubernetes our ultimate aim is to deploy applications in the form of containers on a set of machines those are configured as worker nodes in cluster. However k8s does not deploy containers directly on the worker nodes. Containers are encapsulated into a k8s object known as pods.
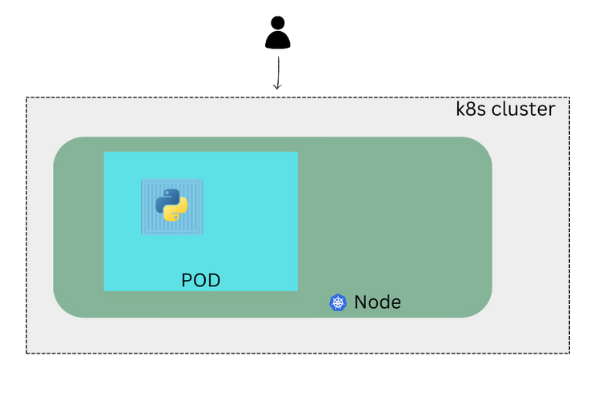
A pod is a single instance of an application. A pod is the smallest object that you can create in k8s. Here we see a simple case where we have a single node k8s cluster with the single instance of your application running in a single docker container encapsulated in a pod.
What if the number of users accessing your application increase and you need to scale your application ? You need to add additional instances of your web application to share the load. Now where would you spin up additional instances ? Do we bring up new container instance within the same pod ? No. We create new pod altogether with new instance of same application.
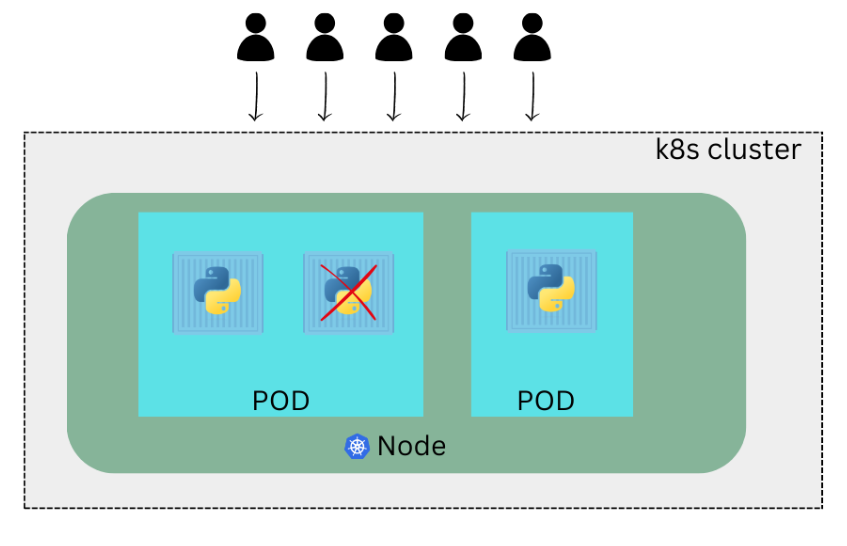
As you can see now we have 2 instances of our web application running on two separate pods on the same kubernetes system or node. What if the user base further increases and your current node has no sufficient capacity ? Well then you have to deploy additional pods in a new node on the cluster. You would add a new node to the cluster to expand the cluster’s physical capacity.
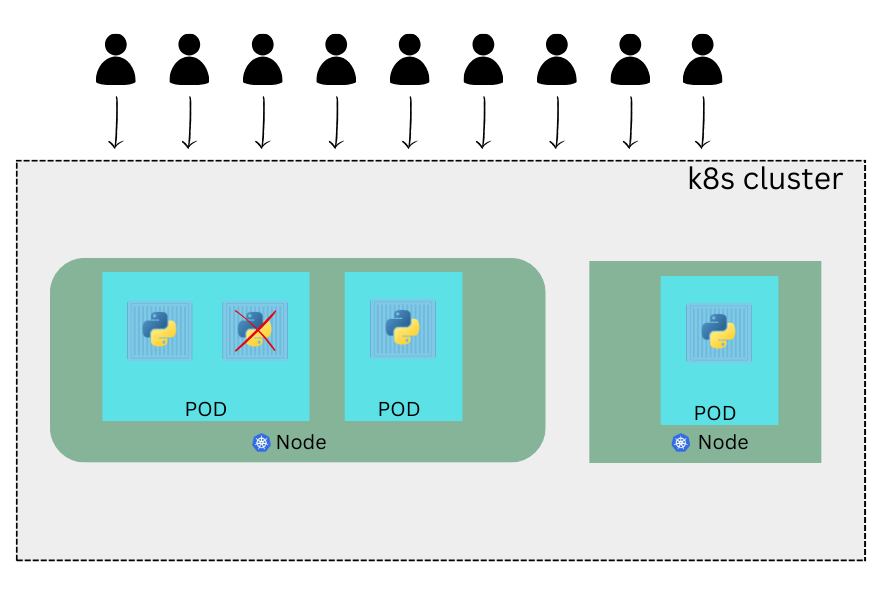
What i am trying to illustrate here is that pods would have a one to one relationship with the containers on the cluster. To scale up you create new pods and to scale down you delete existing pods. You do not add additional containers to scale your application to the existing pod. Also if you are wondering how we achieve all of these and how we implement load balancing between the containers – we will get into that at a later point in time in the networking section. For now we are only trying to understand the basic concepts.
Multi-Container Pod :
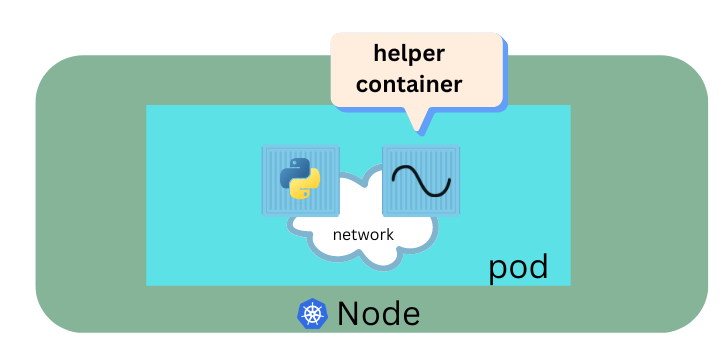
We just said that pods usually have a one to one relationship with the containers . But are we restricted to having a single container inside a single pod ? No. A single pod can have a multiple containers except for the fact they are usually not the multiple containers of the same kind. As we discussed in the previous section when we scale our application then we need to create additional pods. But sometimes you would have a scenario that you need a helper container that might be doing some supporting task for our web application such as processing a user entered data , processing a file uploaded by the user etc . And you want this helper container to live alongside your application container . In that case you can have both of these containers to be part of the same pod. So when a new application container is created the helper is also created. And when it dies the helper also dies since they are the part of the same pod. The two container also communicate with each other directly by referring each other as local host since they share the same network space. Plus they can easily share the same storage space as well.
Utility of Pods
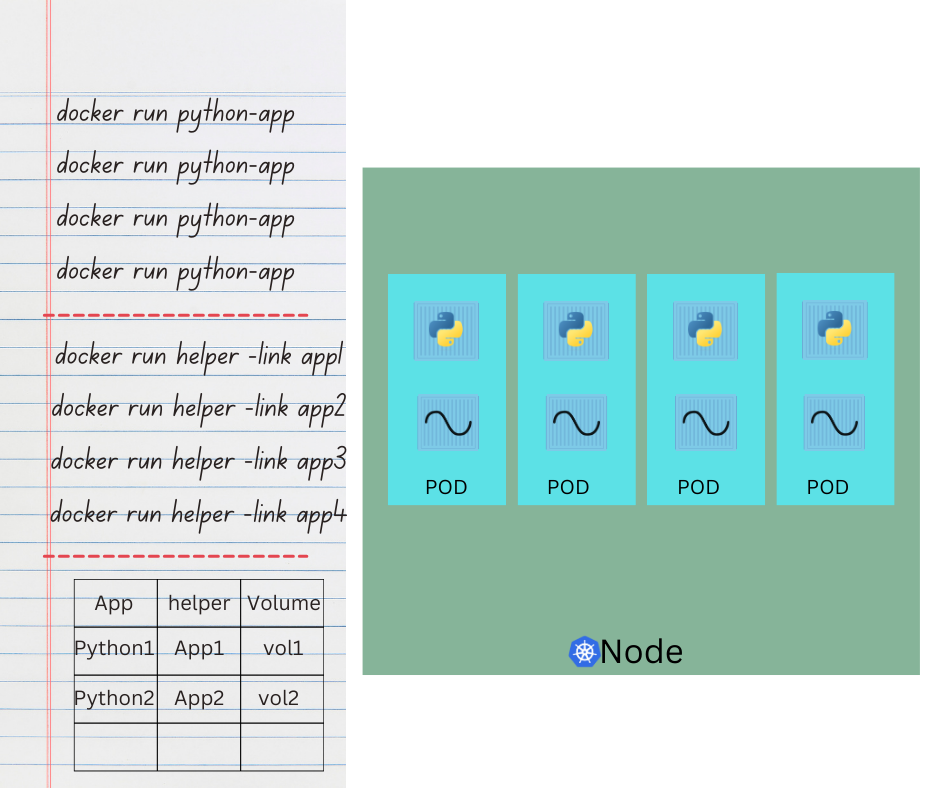
Lets for a moment take k8s out of our discussion and talk about simple docker containers. Lets assume we are developing a process or a script to deploy our application on a docker host. So we have to simply 1st deploy our application by writing a simple docker run python-app command (for example) and the application runs fine and our users are able to access it. When the load increases we deploy more instances of our application by running the docker run commands many more times. This works fine and we are happy. Now sometime in the future our application further developed , undergoes architectural changes and thus grows and gets complex. We now have a helper container that stays with our web application container and its job is to process and fetch data from elsewhere. These helper containers will have one to one relationship with application containers and thus needs to communicate with our application containers directly and access data from those containers. So for this reason we need to maintain a map that – which application containers and helper containers are connected to each other. We would need to establish network connectivity between these containers using links and custom networks , we would need to create sharable volume and share it among the containers and we would need to maintain a map of that as well. And most importantly we would need to monitor the state of the application containers and when it dies then – manually kill the helper container as well as its no longer required. When a new container is deployed , we would need to deploy the helper container of that as well. With pods kubernetes does all of these for us automatically . We just need to define which containers a pod is consists of – and the containers in a pod will have the access to the same storage , same network namespace by default. Also the same fate as in they will be created together and destroyed together.
Even if our application didn’t happen to be so complex and we could live with the single container kubernetes still requires you to create pods. Because this is good in the long run because now your application is equipped for architectural changes and can scale in the future. Note that multi container pods are a rare use case and we are going to stick to the single container pod in this course.
How to deploy pods ? – Hands-on :
Now we are going to deploy a pod in our minikube cluster . As we already discussed – a pod is the most basic and smallest unit in kubernetes.
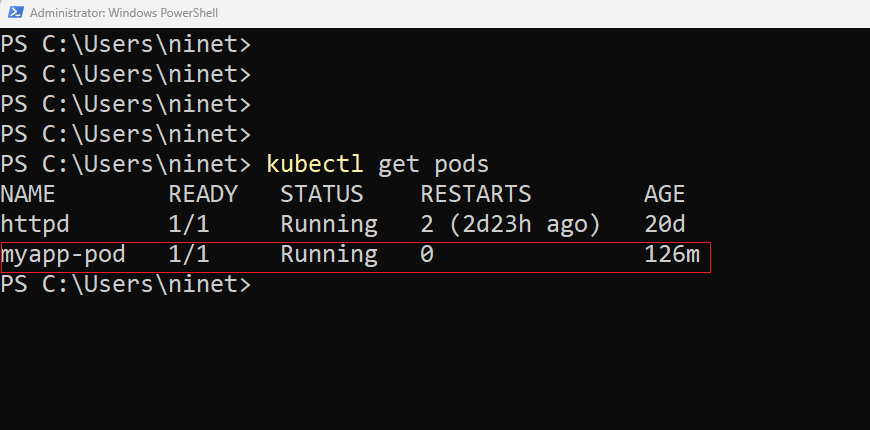
We will use the kubectl command line utility to interact with the cluster. In the previous section of this blogpost I have already shown you how to install and configure minikube cluster and as a part of that configuration we have already kubectl command line tool available to work with the cluster. We will run the command kubectl run httpd –image=httpd . Here 1st httpd is the name of the pod and 2nd httpd is the docker image to be used. Well the pod name could be anything but the image name has to be a valid image available on dockerhub or any other container registry . You can additionally specify a tag for the imageName or a different address to an image hosted to another registry if the image is hosted in a place thats other than dockerHub. Once we run this command we see a pod by the name httpd has been created. You can check the status using the kubectl get pods command.
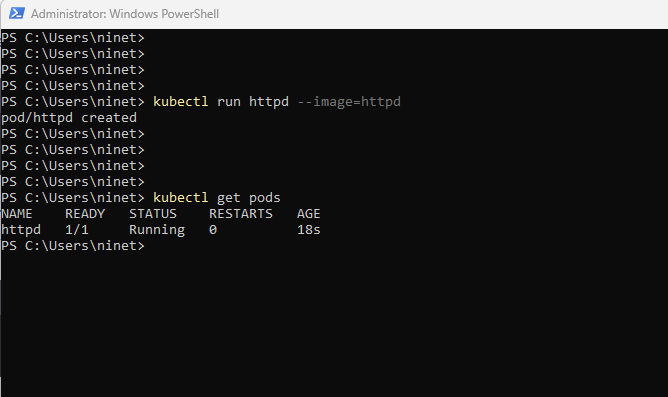
here you can see the column name is httpd , the status is running . We also see that there is a ready column which shows the number of containers in ready state. We also see if the container got restarted since its got created and how long the pod being running.
What kubectl run command really does ?
It deploys a docker container by creating a pod. It 1st creates a pod automatically and then deploys an image of the httpd docker image. But from where does it get the application image from ? For that you need to specify the image name by specifying the image parameter in the command. The application image – in this case the httpd image is downloaded from the dockerhub repository . DockerHub as we discussed is a public repository where latest docker images of various application is stored. You can configure kubernetes to also pull the image from a private repo of a particular organization. Also remember we haven’t discussed the concept of how users access the apache(httpd) web server ? In the current state we haven’t made the web server accessible to the external users . You can access it from the node but for now we will stick to just the concept of how to deploy a pod . Later in this tutorial once we will talk about the networking and services we will get to know how to make this service accessible to end users.
kubectl describe pod Command :
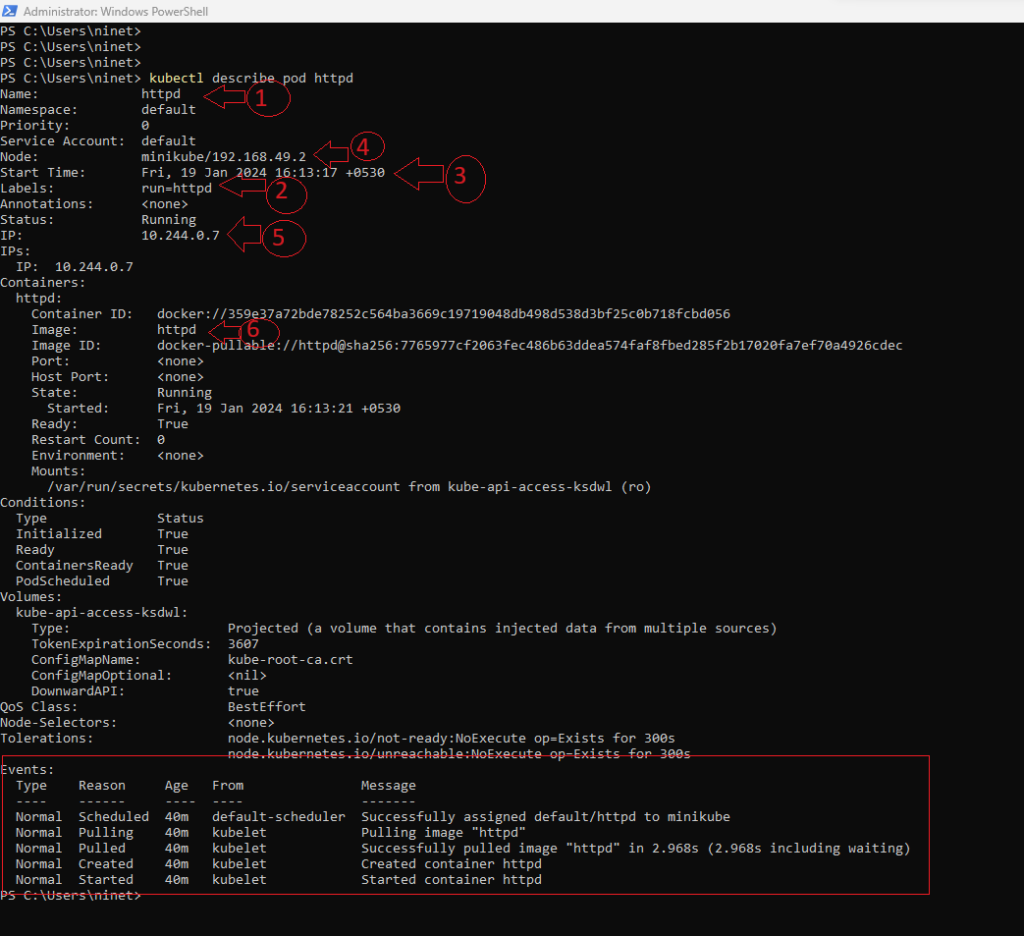
We can get more information related to the pod by running the kubectl describe pod httpd command. And you notice that , it provides a lot more information as compared to the get pod command. For example (follow below screenshot)
- The name of the pod being httpd,
- It also shows any levels that has been assigned to this pod. So this was created by default when we ran the “run” command .
- It shows when it was started.
- It also shows the node that it is assigned to along with the ip address of the node. As you know in our case we just have a single node cluster setup using minikube. the node name is also minikube and after that the ip address of the worker node.
- Secondly it also shows the ip address of the pod .Which is denoted by the column IP and the value is 10.244.0.7. We will cover more about IP addresses of the pod later in the networking section.
- Moving on next as you can see it displays information related to the containers . We know that there is a single container having the name httpd . If we have multiple containers it will be displayed here. In the upcoming section I will explain about multi-container pod. Here you can also see that httpd image was pulled from dockerhub.
- If you scroll all the way to the bottom you will see additional information about the events. Here you can see the list of events that has been occurred since the pod was created. We can see in the screenshot below it went through multiple stages before its started . The pod was assigned to the minikube node. If there were multiple nodes you’ll see which node the pod was assigned to. Next it entered the pulling phase where httpd image was pulled down from dockerhub successfully. Finally the container called httpd was created and started.
There is one other command that we can use to check the status of the pod, and that is the same command as before but with -o option. [ kubectl get pod command -o wide ], with the dash wide option , this provides additional information such as where the pod is running and the IP address of the pod as well.
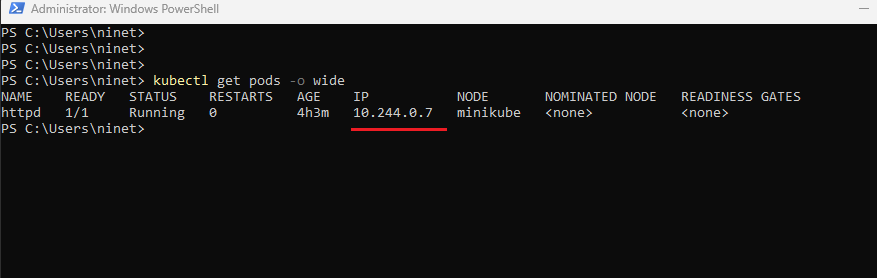
So this IP [10.244.0.7] as in the above screenshot is the internal IP address of the pod itself. Each pod gets an internal IP of its own within the Kubernetes cluster. But we will talk about more on that later. This is a quick demonstration on how to run a pod in miniKube environment.
Pods with YAML :
Next we will discuss how to create a pod using a yaml based configuration file. If you don’t know how to generate yaml file in general you can checkout this blogpost . Here we will learn how to create yaml file specifically for kubernetes. Kubernetes uses Yaml files as inputs for creation of the objects such as pods , replicas , deployments, services etc. All of these follow similar structure. A kubernetes definition file always contains 4 top level fields – The API version, kind, metadata and spec. These are the top level or root level properties. These are also required fields so you must have them in your configuration file.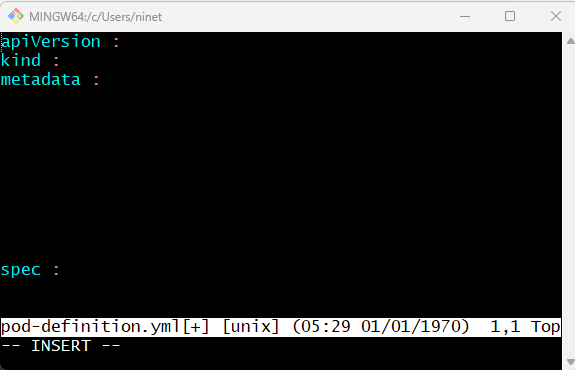
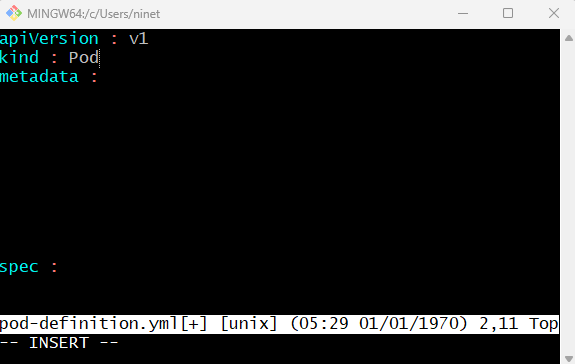
Let us look at each one of them. The 1st one is the API version. This is the version of the kubernetes API we are using to create the object. Depending on what we are trying to create we must use the right API version. For now since we are working on the pods we will set the API version to v1. Few other possible values for this field are :
Pod : v1
Services : v1
Replicaset : apps/v1
Deployment : apps/v1
We will talk about what these are(the other objects) for later in the tutorial. Next is the kind. Kind is the type of object we are trying to create. Which in this case happens to be a pod. So we’ll set it as pod (with a capital P) . It is case sensitive – it’s important to remember .
Other possible values here are replicaset, deployment or service. Next is metadata. Metadata is the data about the object like its name , labels etc. As you can see unlike the 1st two where you have specified the string value , this is in the form of a dictionary. Metadata is a dictionary . So everything under metadata are right indented and name and label are children of metadata.
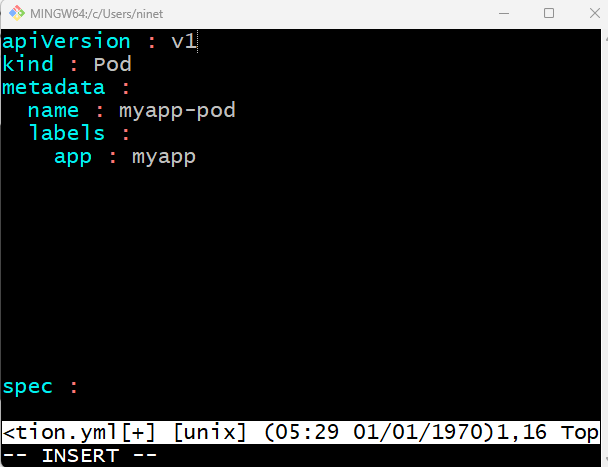
The number of whitespaces before name and labels doesn’t matter but they should be same – as they are siblings. If you give more whitespaces in the left of labels then it will be considered as the child of name not siblings of name – which is incorrect. But both name and labels should have more whitespaces in the left than metadata has – because they are children of metadata , they should be more right indented.
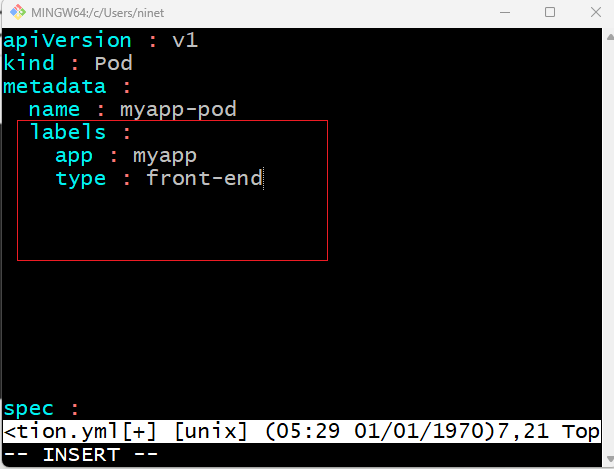
Under metadata , name is a string value. You can name your pod as myapp-pod. Labels is a dictionary. Basically labels is a dictionary within the metadata dictionary. It can have any key-value pair as you wish – so which means it can have as many labels as you want under it. . For now i have added into it the label – app with the value my-app(follow above screenshot). Similarly you could add other labels as you see it fit which will help you identifying this object at a later point in time. Say for example there are 100s of pods running a frontend application and 100s of pods running a backend application or a database. It will be difficult for you to group these pods once they are deployed. If you label them now as frontend , backend or database then you will be able to filter the pods based on the labels at a later point in time. Its important to note that under metadata you can only specify name or labels or anything else that kubernetes expects you to write under metadata. You can not add any random property as per your wish under this. However under labels you can have any kind of key and value pairs as you see fit.
Its important to understand what each of these parameters expects. So far we have only mentioned the type and name of the object we need to create. Which happens to be a pod with the name myapp-pod but we haven’t really specified the container or the image we need to have in the pod. The last section in the configuration file is the specification section which is written as spec. Depending on the object we are going to create this is where we provide additional information to k8s pertaining to the object . This is going to be different for different objects . So its important to understand or refer to the documentation to get the right format for each. Here since we are only creating a pod with a single container in it – it is easy. Spec is a dictionary. It has an object called containers. Containers is a list or an array.
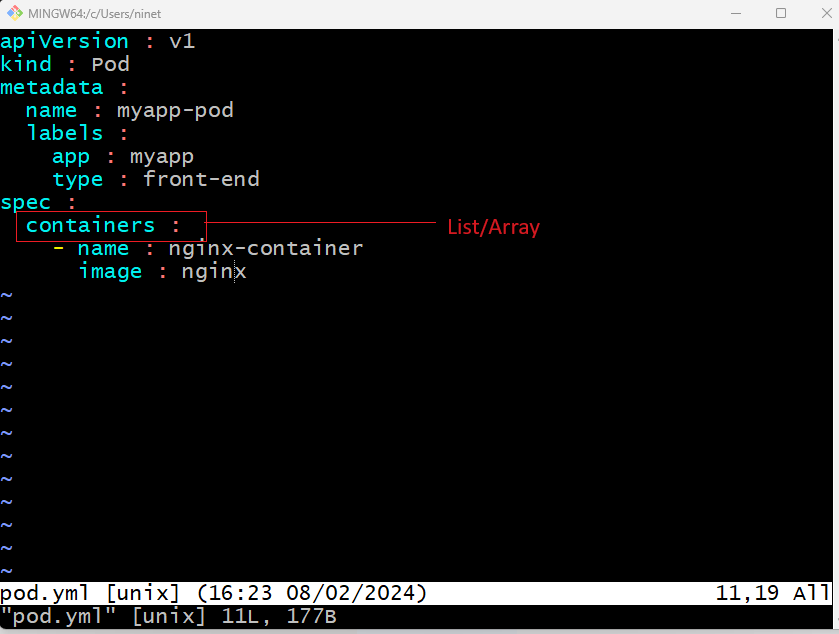
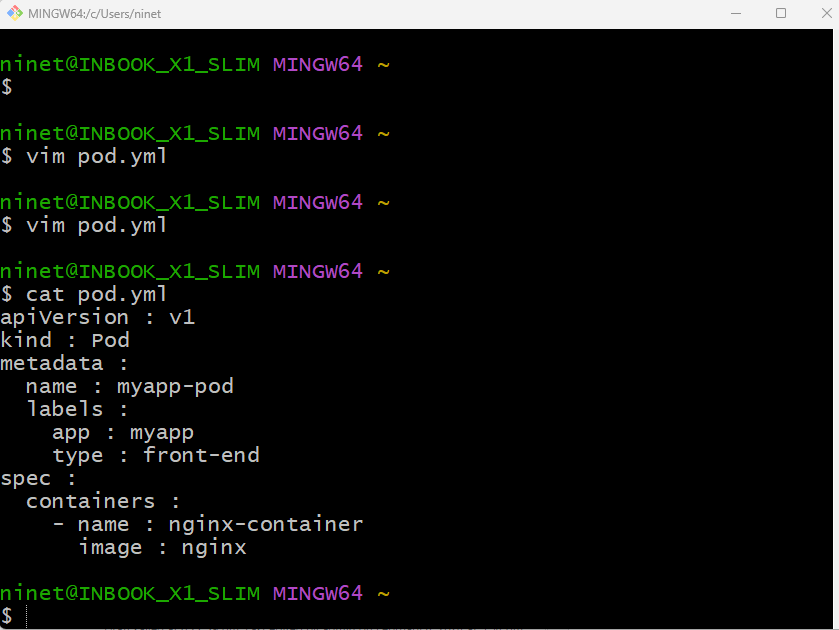
The reason being this property is a list is – a pod can have multiple containers within it as we discussed in the previous section. 1st give it a name : nginx-container . Note that this is the name of the container within the pod . If there are multiple containers then each can have a different name . So one container could be named nginx-container and another container could be named helper. Any name that makes sense to you. Although in this case we will add a single item to the list since we planned to have only a single container in the pod. The dash before the name indicates that this is the 1st item in the list. The item in a list is a dictionary so add a name and image property. The value for image is nginx. Which is the name of docker image in dockerhub repo. If you are using any other container registry other than dockerhub then make sure to mention the full path to that image repository here. Now i’m going to hit escape(Esc) colon(:) wq to save this file . We will just use the cat command to make sure that the file has created with the expected content . Make sure the format is correct.
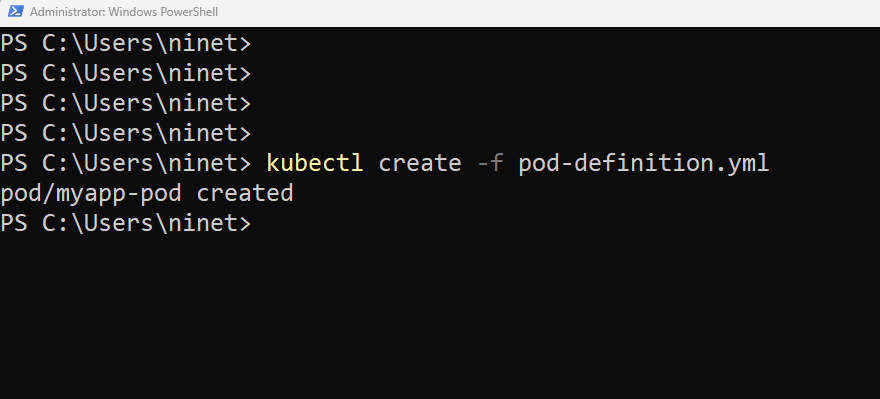
Once the file is created run the command kubectl create -f followed by the filename that is pod-definition.yml and kubernetes creates the pod. By the way you can also use kubectl apply command. Create and apply commands works kind of same if you are creating a new object. You can either use create or you can use apply – doesn’t matter.
So to summarize – remember the 4 top label properties . API version, kind, metadata and spec. Then start by adding values depending on the object you are going to create. Once you create the pod – how do you see it ? use kubectl get pods command to see the list of pods available. In this case its just 1. To see detailed information about the pod run the kubectl describe pod command. This will tell you information about the pod, when it was created , what labels are assigned to it, what docker containers are part of it and the events associated with that pod.
YAML file using vim editor :
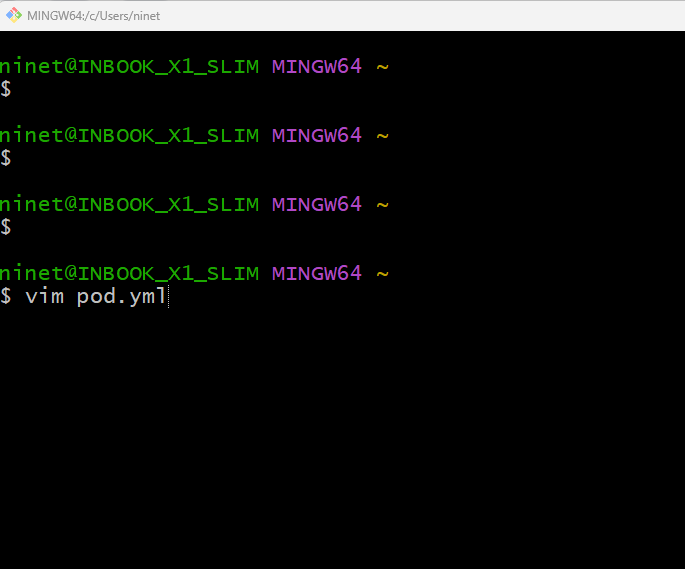
So our goal is to create a yaml file with the pod specifications in it. There are many ways to do it. You could just create it using any one of the text editor. If you are on windows just use notepad or if you are on linux you can use any of the native editors like vi/vim. An editor with support for yaml language would be very helpful in getting the syntax right. So instead of notepad in windows , notepad++ in windows or vim in linux would be better. I will talk more about tips and tricks , other tools and IDEs that can help with this more in the upcoming sections. For now lets take a very basic form of creating a YAML file using vim editor on your linux system. Or if you are like me on windows you can use Git Bash which provides a Unix-like command-line environment on Windows, including support for Vim. you can use Git Bash on Windows to edit YAML files. So here I’m on my Git bash terminal. here i am making use of vim text based editor to create pod definition file. The name of the file i am going to call as pod.yaml.
In the next post, we will learn some tips and tricks how to develop yaml files using IDEs.
