As organizations increasingly adopting open cloud and container technologies, the demand for Kubernetes professionals is soaring.
![]() According to the Linux Foundation Research, a staggering 77% of organizations are expanding their use of open cloud and container technologies like Kubernetes. This showcases the pivotal role that kubernetes plays in the industry.
According to the Linux Foundation Research, a staggering 77% of organizations are expanding their use of open cloud and container technologies like Kubernetes. This showcases the pivotal role that kubernetes plays in the industry.
![]() According to Statista, Kubernetes claimed a substantial 24.4% market share in the container technology market in 2023,, securing its position as the leading container orchestration platform .
According to Statista, Kubernetes claimed a substantial 24.4% market share in the container technology market in 2023,, securing its position as the leading container orchestration platform .
However, despite of it’s evident demand, many beginners find it quite daunting to start learning Kubernetes . The complexity and sophistication of Kubernetes can be overwhelming without a solid foundation and the right learning resources. In this blogpost our mission is to simplify the Kubernetes learning curve by providing step-by-step hands-on demonstrations combined with fun analogies to break down and simplify complex concepts.
Prerequisites to learn Kubernetes :
Containerization : Kubernetes is fundamentally a container orchestration tool – responsible for managing the deployment, scaling and operation of application containers. Without containers kubernetes have nothing to orchestrate . So it’s crucial to establish a solid foundation in containerization and since Docker is the leading container runtime tool so familiarity with Docker is essential. Learn commands such as docker run, docker ps, docker stop, and explore how to create Dockerfiles. Comprehending Docker Compose for orchestrating multi-container applications . You will find detailed tutorial on Docker on our platform to gain proficiency in these topics Docker- The complete guide .
Linux Commands : Next important prerequisite before learning kubernetes is Linux commands. As Kubernetes mostly operates in a Linux environment for managing containers . Learn how to manage file permissions with commands like chmod and chown. Also acquaint yourself with networking commands such as ping and iproute . You need to gain proficiency in text editors like how Vim and Nano works because you will be editing manifest files in Kubernetes cluster into them. We have an excellent resource which covers all these commands at this link Linux for Cloud & DevOps Engineers
Networking : Next very important topic before you learn Kubernetes is networking. In k8s you will frequently come across with the terms like ingress, egress, pod-to-pod communication, load balancing, ports, and firewalls . All these terms require you to have networking knowledge . Networking is a key aspect of Kubernetes, and familiarity with these concepts(ports, load balancers, firewalls) is indispensable . To have networking knowledge you can explore this tutorial Networking fundamentals course for devops . It will cover concepts like IPv4, Subnetting, DNS, DHCP, IPv6, Routing and Ports , TCP. Navigate the networking landscape to understand how different k8s objects like deployments, pods , services communicate with each other.
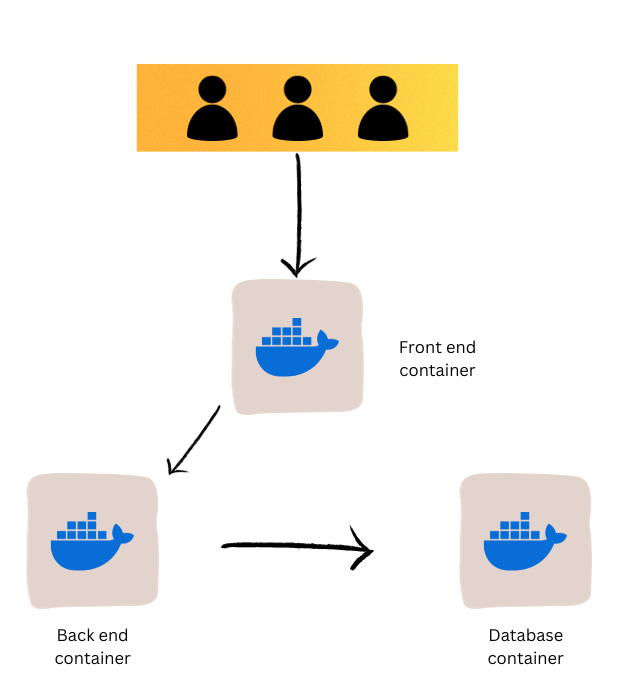
Microservices : Next important prerequisite before learning k8s is microservices . Its an architectural pattern and Kubernetes aligns seamlessly with microservices architectural pattern . where each service is deployed independently as a container. For instance you have an e-commerce application which follows microservice architecture . It will comprise database service as a container , frontend service as another container , backend service as another container all working together to create an e-commerce application . You don’t need to learn in depth about all these but foundational understanding will enrich your Kubernetes journey. You can checkout this hands-on project based course Microservices Architecture – The Complete Guide to learn how to build, deploy, and scale an E-Commerce app using Microservices which is built with Node, React, Docker and Kubernetes
Cloud Providers : While Kubernetes can be run on local machines using minikube or Kubeadm, it’s a de facto standard in the industry to deploy it on cloud platforms like AWS (Amazon EKS), Azure (Azure AKS), or Google Cloud (Google GKE) . Cause deploying kubernetes on cloud has many advantages like you will get necessary infrastructure for hosting kubernetes cluster including virtual machine , storage , networking services , security etc. A good understanding of cloud providers is essential for managing production-level clusters . Learn about cloud infrastructure components like load balancing, autoscaling, monitoring tools that aligns with k8s requirements . You need to have solid understanding about how cloud works to create clusters on cloud. To gain cloud expertise you can checkout our free certification courses like AWS Certified Solutions Architect Associate SAA-C03 , AZ-900: Microsoft Azure Fundamentals , GCP Associate Cloud Engineer which are available on our portal.
YAML : Last but not the least prerequisite , before learning Kubernetes is YAML which stands for “yet another markup language” or YAML ain’t markup language (a recursive acronym). Kubernetes leverages YAML for writing manifests in a declarative way . There are two ways to create k8s objects either imperative way that is by running a command or declarative that is by creating a manifest (which we will discuss in lot more detail in this tutorial). YAML is not only used for writing k8s manifests but also used for writing Ansible playbooks, CI/CD pipeline and lot more. Familiarize yourself with YAML syntax to articulate configurations effectively. Because we will be using this mark-up language all the time to create Pods, Deployments , replicasets or to create anything in k8s. You can checkout this blogpost Yaml – Zero to Hero to learn basic syntaxes ; key-value pairs , data types, handing lists ,validation tools , and capabilities with use cases.
Why Kubernetes ?
now that we know about containers and we know how an application is packaged in docker container. But whats next ? how do you run it in production ?
Case Study :
Consider a rapidly growing e-commerce platform that initially adopted Docker containers to package and deploy its microservices-based application. The development team successfully created containerized versions of various services, including the web server, payment gateway, and inventory management system.
Challenges:
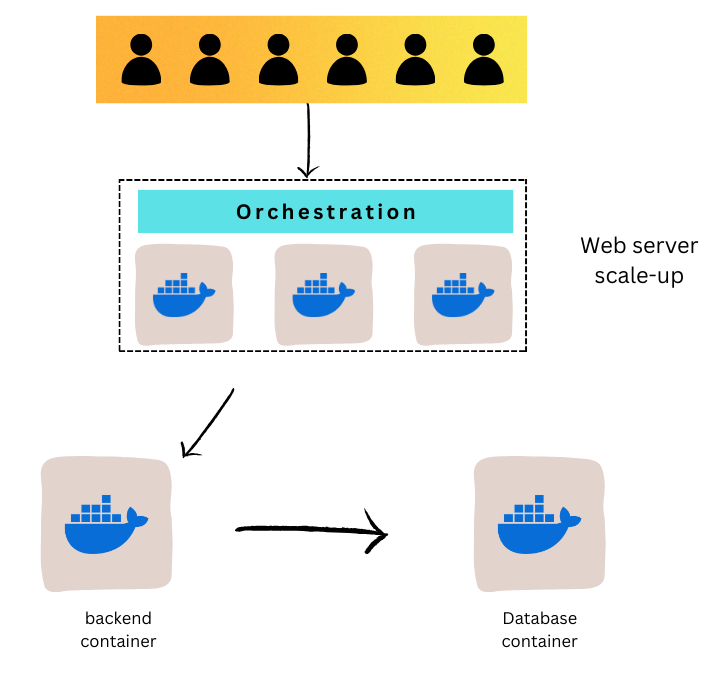
While Docker simplified the process of packaging and deploying individual microservices, but What if you are experiencing a sudden surge in user traffic and the platform needed a mechanism to scale up rapidly ? similarly how do you scale down when load decreases ? So there is a scalability issue.
Similarly the application relies on other backend containers like database services and messaging services . Coordinating the deployment and lifecycle of these interconnected containers became complex. So there is a Dependency Management issue.
Solution :
To enable these functionalities you need an underlying platform with set of resources and capabilities . The platform needs to orchestrate the connectivity between containers and automatically scale up or down based on the load. This whole process of automatically deploying and managing containers is known as container orchestration and Kubernetes is a container orchestration technology and by far the most popular one among its competitors like docker Swarm and Mesos
Kubernetes Architecture: Master and Worker Nodes :
Before diving into setting up a Kubernetes cluster, understanding its architecture is crucial. So that you can make a sense of the terms that we will encounter while setting up kubernetes cluster. Let us start with nodes.
Nodes : A node or worker node is a machine, either physical or virtual, on which Kubernetes is installed. In the past, nodes were referred to as “minions,” and these terms are sometimes used interchangeably. A node is a worker machine and that is where containers will be launched and run by kubernetes .
But what if the node running your application fails – well obviously your applications goes down. So you need to have more than one nodes .
Cluster : A cluster is a set of nodes grouped together. Clusters provide redundancy, meaning even if one node fails, you still have your application remains accessible from other nodes. Moreover, having multiple nodes allows for load sharing. The primary purpose of a cluster is to ensure high availability and efficient resource utilization.
Now we have a cluster but who is responsible for managing the cluster ? Where is the information about the members of the cluster stored ? How are the nodes monitored ? when a node fails how do you move the load of the failed node to another worker node ? Thats where the master comes in .
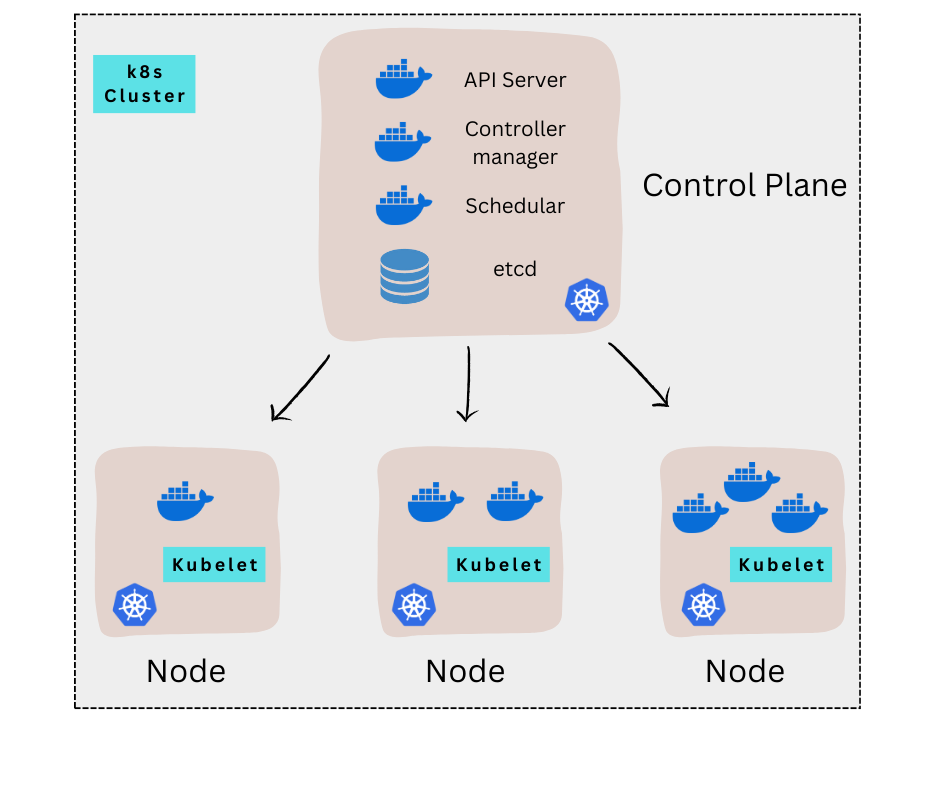
Master Node : The master node is responsible for managing the entire cluster. It oversees and orchestrates container operations on worker nodes. A master is just like another node where kubernetes is installed and is configured as master . It is also known as the control plane .
Functions:
- Cluster Management: The master node maintains information about the members of the cluster.
- Monitoring: It monitors the state of various nodes.
- Orchestration: When a node fails, the master node redistributes the workload to other worker nodes.
Components :
Now let’s talk about the various components . When you install kubernetes on your system you are actually installing following components
- An API server
- An etcd service
- A kubelet service
- A container runtime
- Controllers
- Schedulers
1. API Server :
The master server has a kube-api server and that is what makes it a master .The API server acts as the gateway to the Kubernetes cluster. All interactions — whether from users, management devices, or command-line interfaces — converge here . All they talk to the API server to interact with the kubernetes cluster. It processes requests and ensures seamless communication between the cluster and its users.
2. etcd :
At the heart of Kubernetes lies etcd, etcd is a distributed reliable key-value store used by k8s to store all data used to manage the cluster . It serves as the memory of the cluster, storing essential data used for management . Think of it in this way . when you have multiple nodes and multiple masters in your cluster (you would have multiple masters at least two in a production setup) , etcd stores all that information about all the nodes in a cluster in a distributed manner. Etcd is responsible for implementing the logs within the cluster , crucial for preventing conflicts between the masters.
3. Schedulers :
The schedular is responsible for distributing work or containers across multiple nodes . It is installed on master. Schedulers are like traffic directors of the Kubernetes cluster. Their primary task is to look for newly created containers and assigns them to nodes.
4. Controllers :
Controllers are the brain centre behind the orchestration . It is installed on master. They are responsible for noticing and responding promptly when containers , nodes or endpoints goes down. The controller steps in and makes decisions to bring up new containers in such cases.
5. Container Runtime :
The container runtime is the underlying software used to run containers . In our case it happens to be docker but there are other options as well like Rcketr or RKT , cri-o . However in the Kubernetes ecosystem, Docker is a common choice .To run docker containers into a system we need container runtime to be installed on worker machine . Container runtime handles the nitty-gritty of container operations — from starting and stopping to resource management.
6. Kubelet :
Finally kubelet is the agent that installed and runs on each worker node of the cluster. The agents are responsible for making sure that the containers are running on the nodes as expected. It takes instructions from the control plane(master), initiating or terminating containers based on the desired state. It is also responsible to provide master the health information of the worker node , carry out actions requested by master on the worker node. All the information gathered is stored in a key-value store on the master, which is based on etcd framework which we have already discussed.
Minikube and KubeCTL :
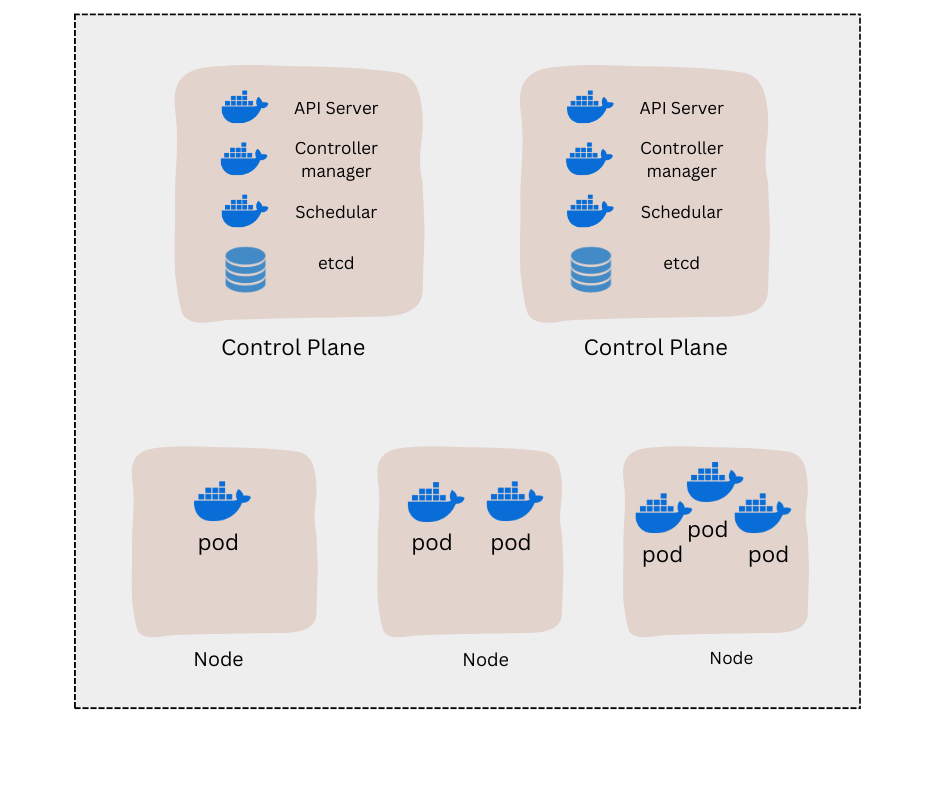
Next I will tell you what minikube and kubeCTL are and how to set them up? 1st of all lets discuss what is minikube ? Usually in the kubernetes world when you setup a production cluster it will look something like this – you would have multiple masters at least two in a production setting and you would have multiple nodes. Master nodes and worker nodes have their own separate responsibility . As you see in the diagram you would have actually separate physical / virtual machine that each represent a node.
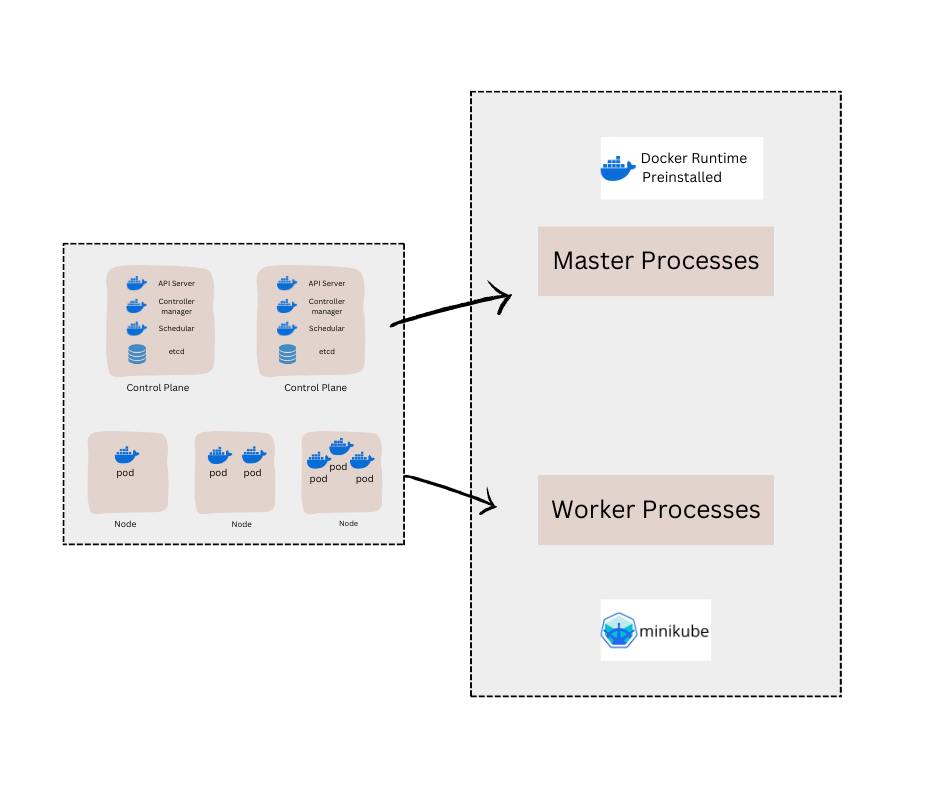
Now if you want to test something on your local environment or if you want to try something out very quickly (for example deploying new application or trying out new components) and you want to test it on your local machine obviously setting up a cluster like this is pretty difficult or maybe impossible if you dont have enough resources like memory or cpu etc. Exactly for the use case we have this open source tool called minikube. So what is minikube ? – minikube is basically one node cluster . The master processes and the worker processes both run on one node. And this node will have a docker container runtime preinstalled. So you will be able to run the conatiners or pods with containers on this node.
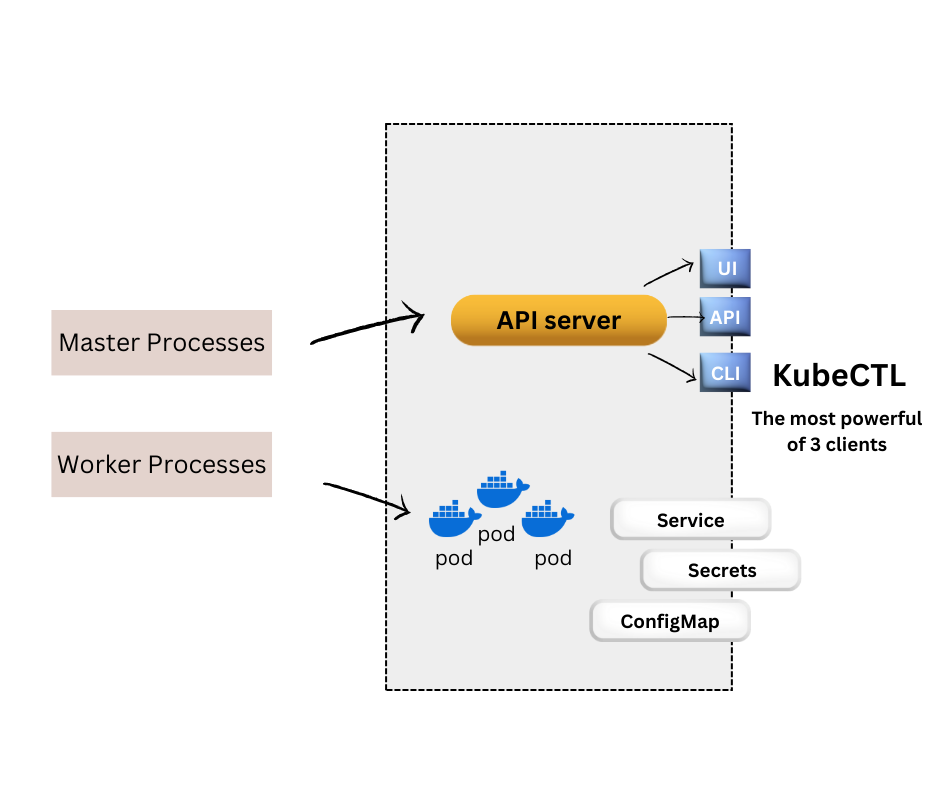
Now that you have this virtual node on your local machine that represents minikube – you need some way to interact with it i.e. interact with the cluster. Because you need a way to create pods and other kubernetes components on this node. And the way to do this is using kubeCtl which is a command line tool for kubernetes cluster. So lets see how it actually works. remember I said that minikube run both master and worker processes. One of the master processes called API server (which we discussed before) is actually the entry point in kubernetes cluster. So if you want to do anything into the cluster , if you want to configure any component you 1st talk to the API server. And the way to talk to the API server is through the different clients . You can have a UI like a dashboard, You can talk through the API, or a command like tool called kubectl. KubeCtl is the most powerful of all the 3 clients . Because using KubeCtl you can basically do anything that you want to do with k8s. Throughout this tutorial we will use KubeCtl mostly. So once the KubeCtl creates the communication with API server to create component to delete component etc – the worker processes on the minikube node actually make it happen . They will be actually executing the commands to create the pods , destroy the pods, create services etc. This is the minikube setup and this is how kubeCtl interact with the cluster. One important thing to note here is kubectl is just not only for the minikube cluster if you have a cloud cluster or a hybrid cluster – KubeCtl is the tool to interact with any type of k8s cluster.
Now that we know what minikube and kubeCtl are – lets install to see them in practice .
Install and Run Minikube :
There are many differnt ways depending on your operating system and its architecture so the best way is to referance official documentation -> https://minikube.sigs.k8s.io/docs/start/
Minikube can run either as a container or as a virtual machine. Below are the resource requirements to run minikube on your machine. Make sure you have enough resources.
2 CPUs or more
2GB of free memory
20GB of free disk space
Internet connection
Container or virtual machine manager,
such as: Docker, QEMU, Hyperkit, Hyper-V, KVM, Parallels, Podman, VirtualBox, or VMware Fusion/Workstation
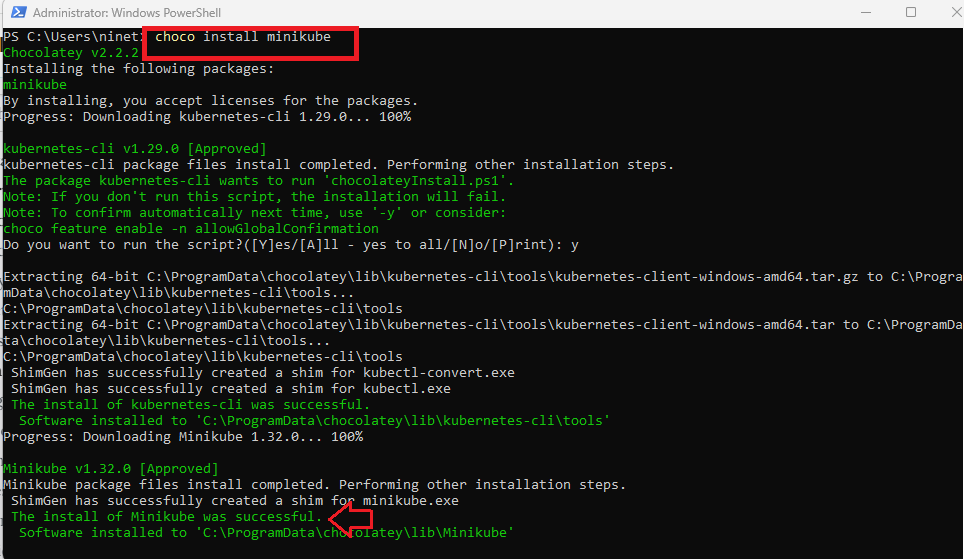
For installation select the correct data for your machine . In my case its gonna be windows with Chocolatey installation and with one simple choco install minikube command I can basically install minikube.
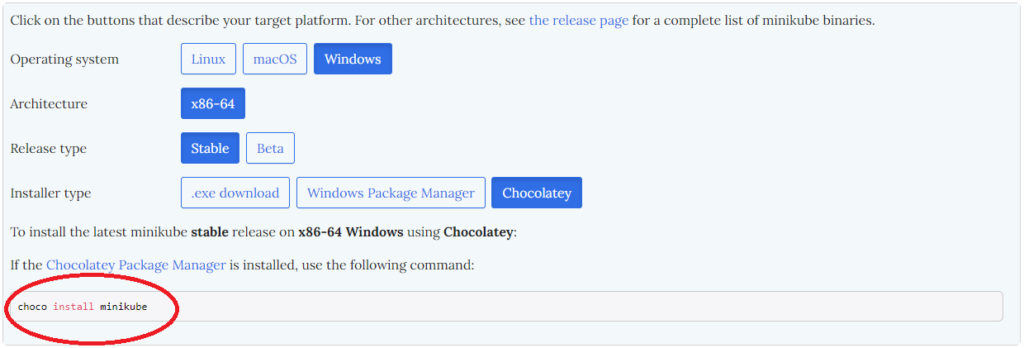
As you see in screenshot the latest minikube version has been installed.
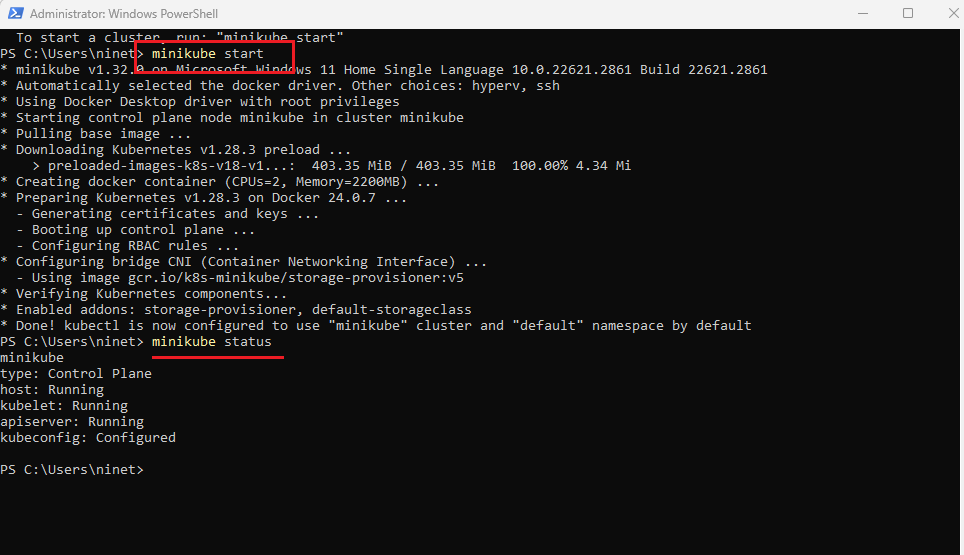
Once minikube is installed we want to start or create a minikube cluster. Which is also super easy – we simply have to execute minikube start command.
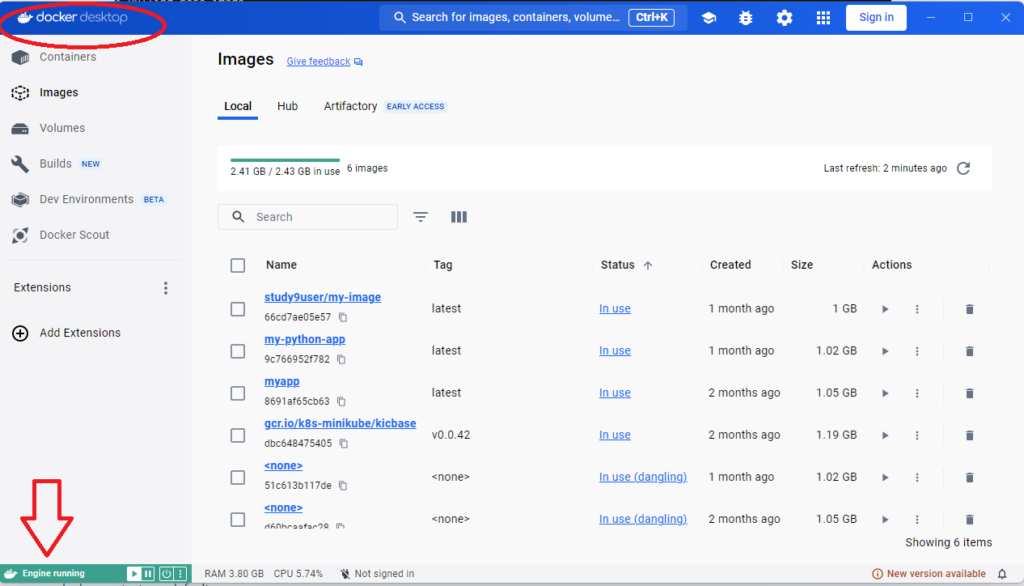
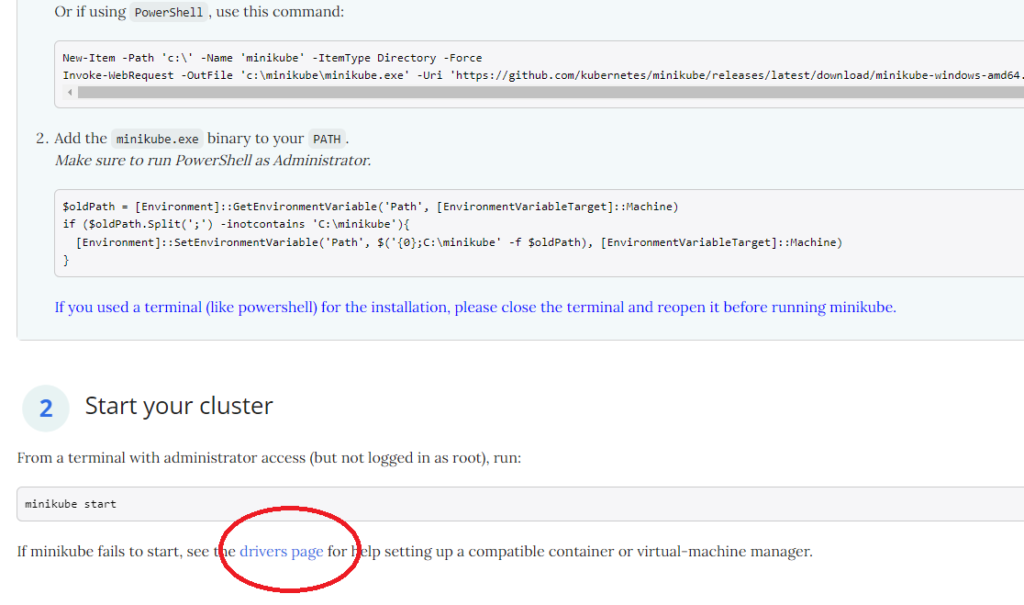
However as i mentioned minikube must start either as a container or as a virtual machine. So we need either container or a vm installed on our laptop to run minikube.
This is going to be the driver for minikube. If you open the drivers page(https://minikube.sigs.k8s.io/docs/drivers/) you see the list of supported drivers for linux , mAc and windows and you see that docker is actually the preferred driver for running minikube on all OS.
Now this may sound a little bit confusing because we know inside the k8s cluster we run docker containers and its important to note here that minikube installation actually comes with docker already installed to run those container. But docker as a driver for minikube means that we are hosting minikube on our local machine as a docker container itself. Which means , we have two layer of docker. Minikube running as docker container and inside minikube we have docker packaged to run our application containers. And for hosting minikube on our machine we can use docker.
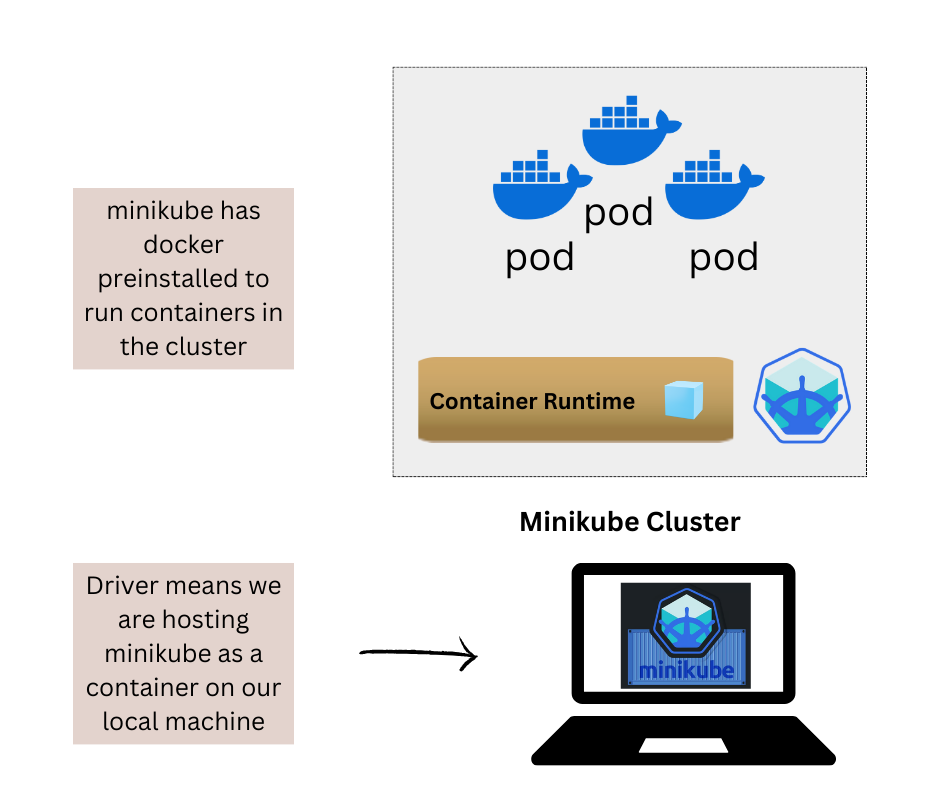
So if you have docker pre installed(like me) on your machine you are all setup to install minikube cluster. If not also not a problem check this blog and install docker. Once docker is installed and running we can switch back to the terminal and start minikube cluster using minikube start command. If you see any warning that Minikube trying to determine the current Docker CLI context. Run following commands to configure a default context.
docker context use default

As you see all the components inside are running everything is configured and now start interact with the cluster using kubeCTL command line tool. KubeCtl is actually installed as a dependency when we install minikube. Next i will write kubectl get node and this will display all the nodes in the cluster . In our case we just have one node which is control plane and the worker node at the same time.
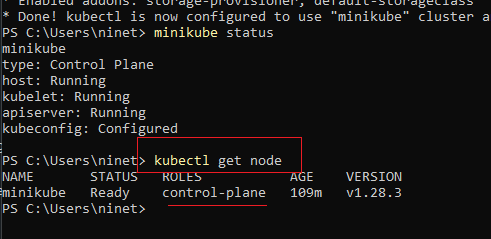
And we see the information about each node that is status, k8s version as well as when it was created i.e. age . With this we now have a actual k8s cluster running locally on our machine. From this point we are going to be interacting with minikube cluster using kubeCtl. Minikube is just for the startup and for deleting the cluster but everything else related to configuring we are gonna be doing through kubeCtl.
I hope now you have a solid understanding about what kubernetes is ? what problem it is solving ? How k8s architecture looks like, what are the different components and how to install minikube cluster. That was the goal for this blogpost !
In the next part of this blog I will show you important kubeCTL commands along with hands on demos . Stay tuned.

