
Introduction
Django is a high-level Python web framework that makes it easier to create web sites using Python. Django takes care of the difficult stuff so that you can concentrate on building your web applications. Django emphasizes reusability of components, also referred to as DRY (Don’t Repeat Yourself), and comes with ready-to-use features like login system, database connection and CRUD operations (Create Read Update Delete). This tutorial will guide you through the basics of setting up a Django project and building a simple web application.
Prerequisites
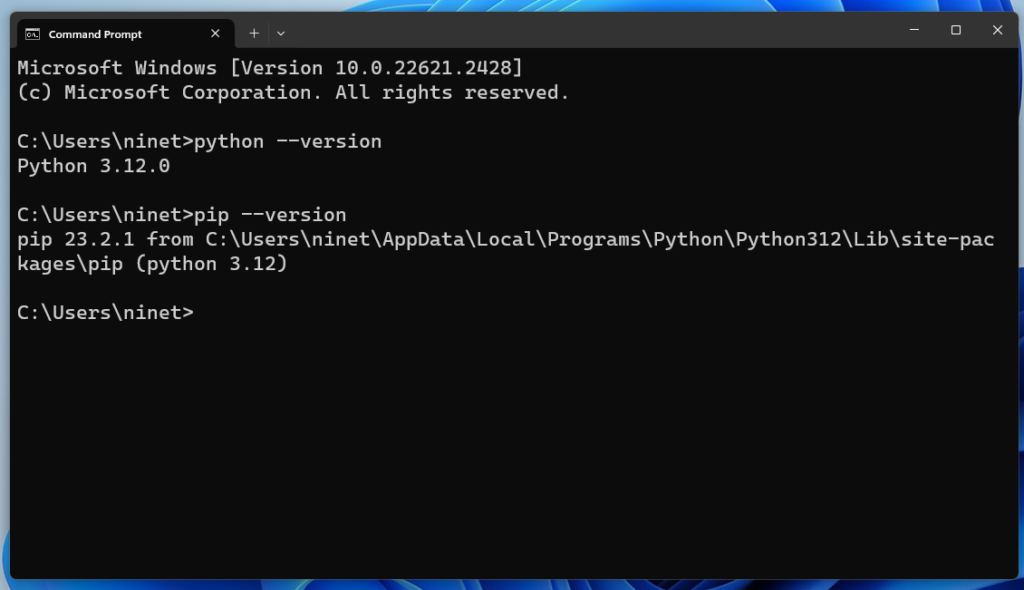
Before you begin, ensure that you have Python and pip installed on your system . To check whether your system has Python and PiP installed, run these commands in the command prompt: you will get a result with the version number.
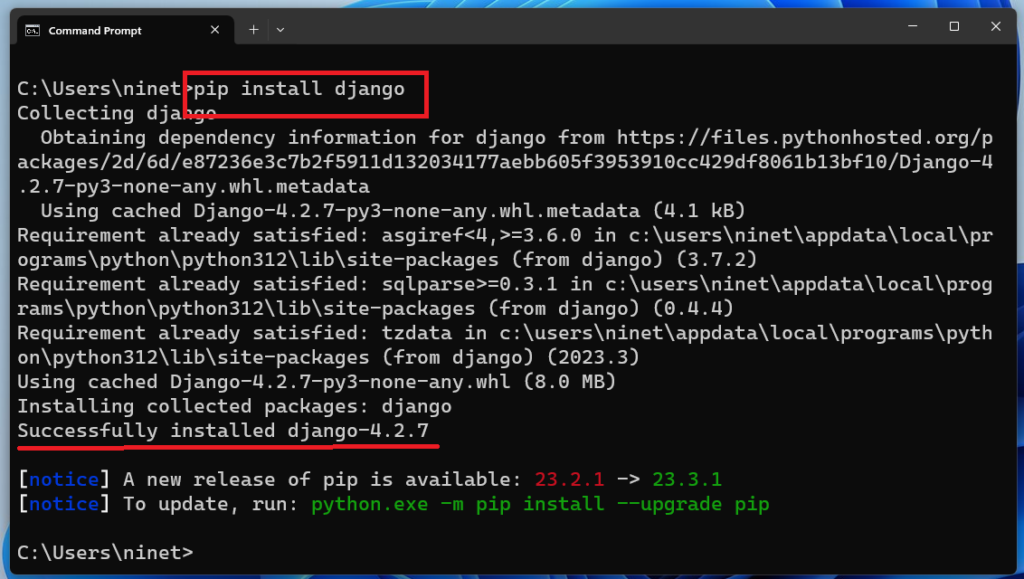
Now You can install Django using pip which is a python package manager , it normally comes with python with versions higher than 3.4 :
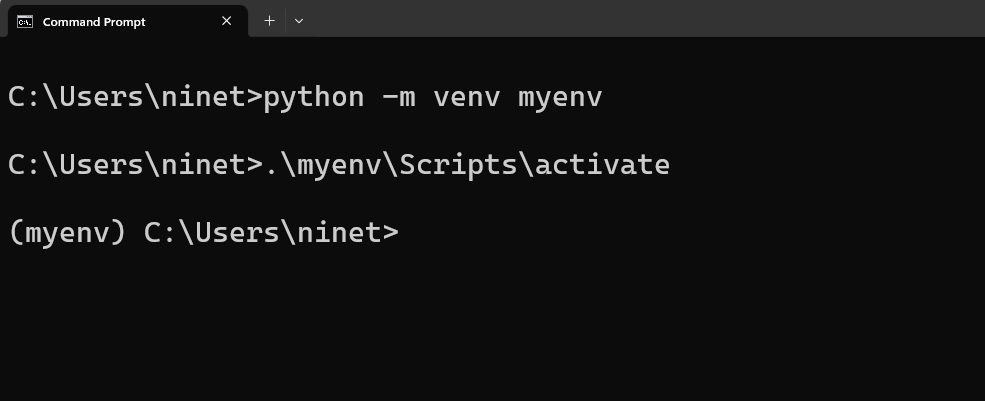
Create a Virtual Environment
It’s a good practice to use a virtual environment to manage dependencies for your project. To create and manage a virtual environment you can use python in-build package venv . The name of the virtual environment is your choice, in this tutorial we will call it myenv:
Activate the virtual environment:
- For Windows:
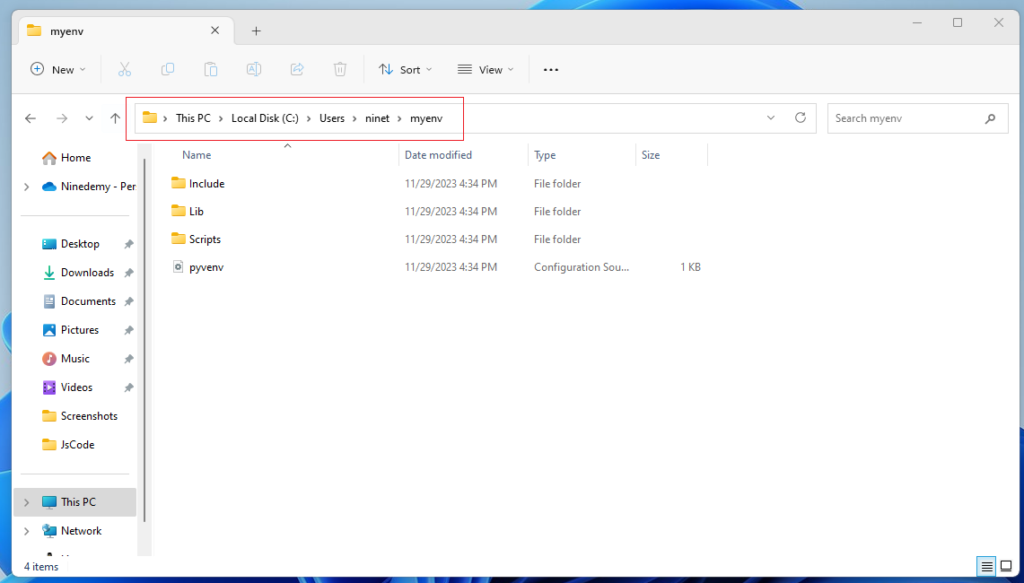
Now if we navigate to the location where we have set up virtual environment myenv – we will see folder and subfolder structure like this :
Create a Django Project
Now, within the virtual environment, create a new Django project – in our case the name of the project is myproject , we have to 1st navigate inside myenv using cd command :

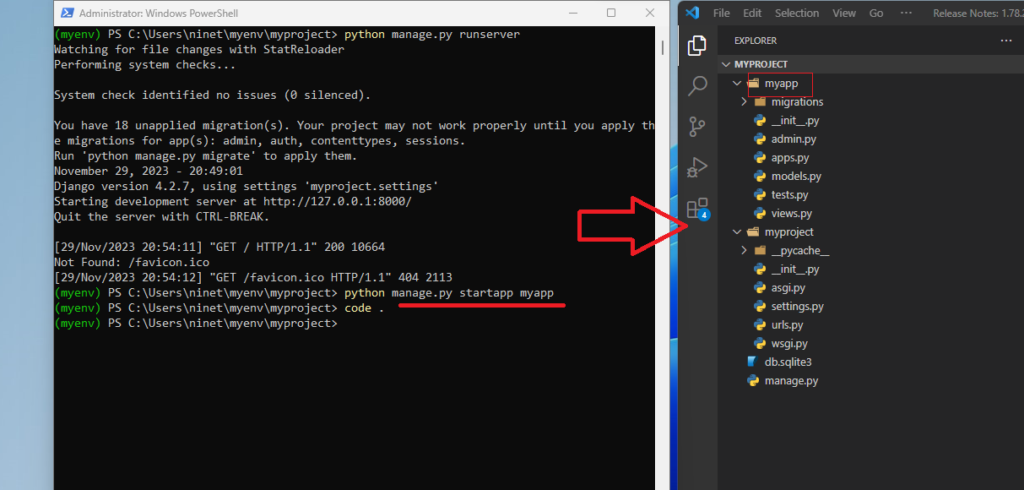
django-admin is a command-line utility that automatically generates the directory structure for a Django project . Let me open the entire directory structure in vs code by writing code(space)(dot)(enter).

When you run the django-admin startproject myproject command, it creates a new directory with the specified project name, in this case, “myproject.” Inside this newly created directory, you will find another directory with the same name, “myproject.” This inner “myproject” directory contains the actual project files and configurations.
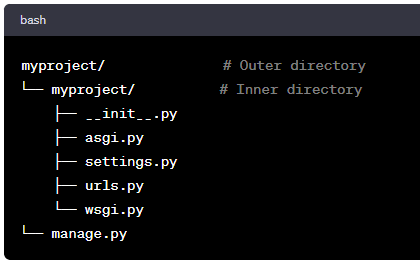
manage.py is a wrapper around django admin. So going forward instead of django admin we will use manage.py. Rest of the files and folders have a specific meaning, which you will learn about some of them later in this tutorial .
Run the Development Server
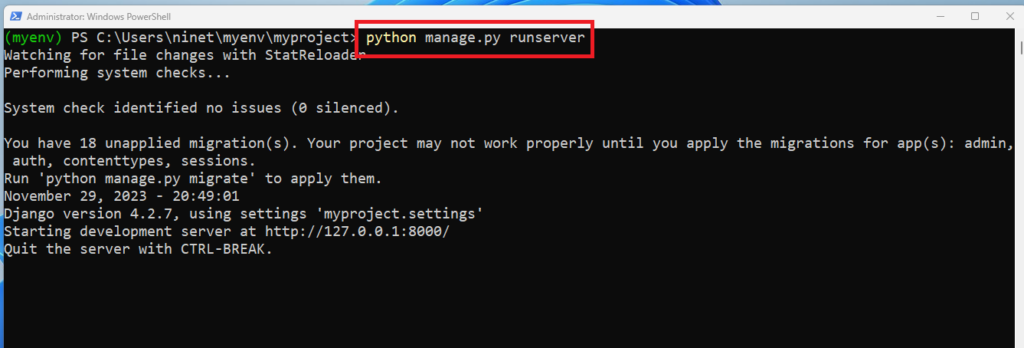
Now that you have a Django project, you can run it, and see what it looks like in a browser. Navigate to the /myproject folder and execute this command as in the screenshot:
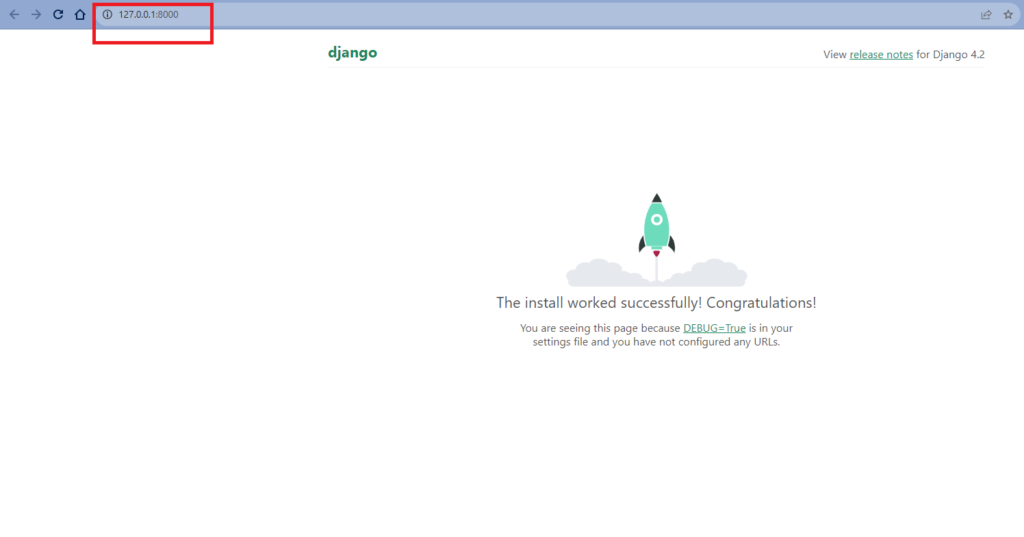
Open a new browser window and type 127.0.0.1:8000 in the address bar. You will see our 1st django project is running successfully on 8000 port (which is the default port for django) In case port 8000 is busy lets say another application is running on 8000 then you have to explicitly mention port number : python manage.py runserver 9000
.
Now that we have a Django project! The next step is to make an app in your project. An app is a web application that has a specific meaning in your project, like a home page, a contact form, or a members database.
Create a Django App
Here in this tutorial we will create a simple app named myapp , if the server is still running, and you are not able to write commands, press [CTRL] [C] to stop the server and you should be back in the virtual environment.:
In Django, a project is composed of one or more apps. An app is a self-contained module that encapsulates a specific functionality or set of related functionalities within a project. Each app typically represents a logical unit in your project, like a home page, a contact form, or any other distinct feature.
For example, in a blogging website:
- You might have an app for handling user authentication (e.g.,
usersapp). - Another app could manage blog posts (e.g.,
blogapp). - Yet another app could handle comments (e.g.,
commentsapp).
In your main project folder, you can have multiple apps. The structure might look something like this:
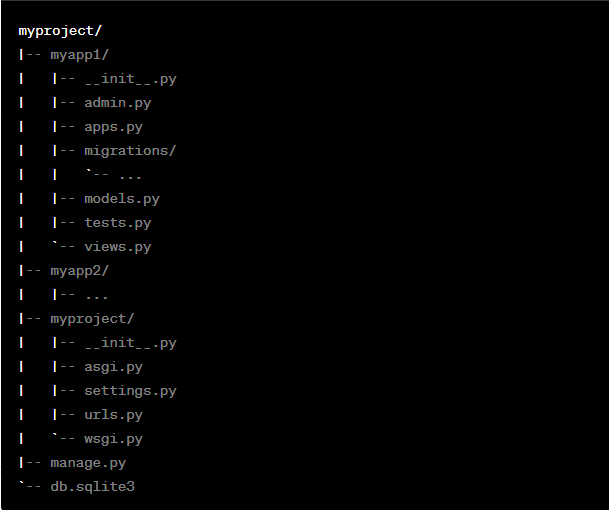
Each app can have its models, views, templates, and other necessary files. This modular approach promotes code organization and maintainability, making it easier to scale your project as it grows.
Writing Views
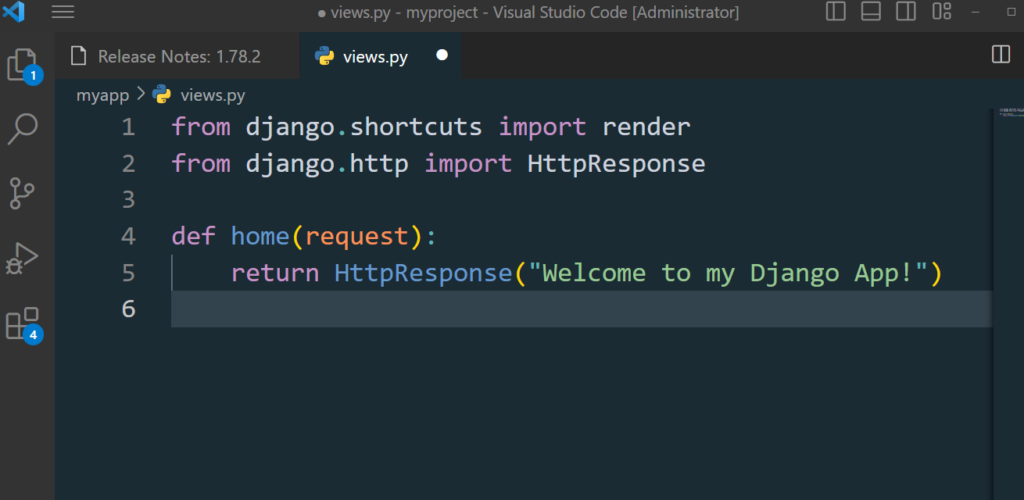
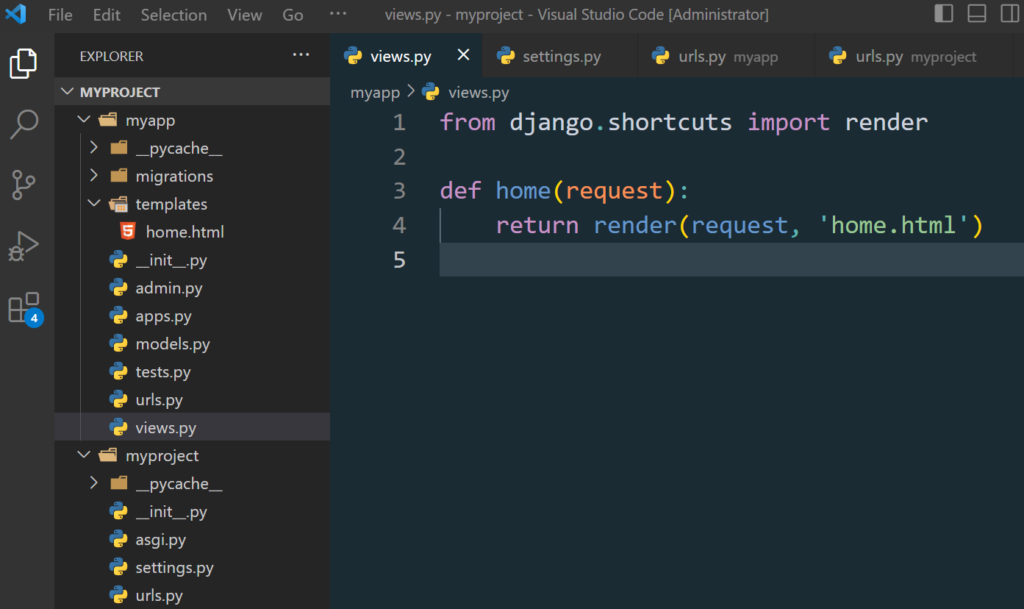
In myapp/views.py, define your views:
In Django, a view is a Python function that receives a web request (HttpRequest) and returns a web response (HttpResponse) . Then it will display HttpResponse maybe in the form of HTML documents using templates, which we will discuss later .
Views are usually put in a file called views.py located on your app’s folder.
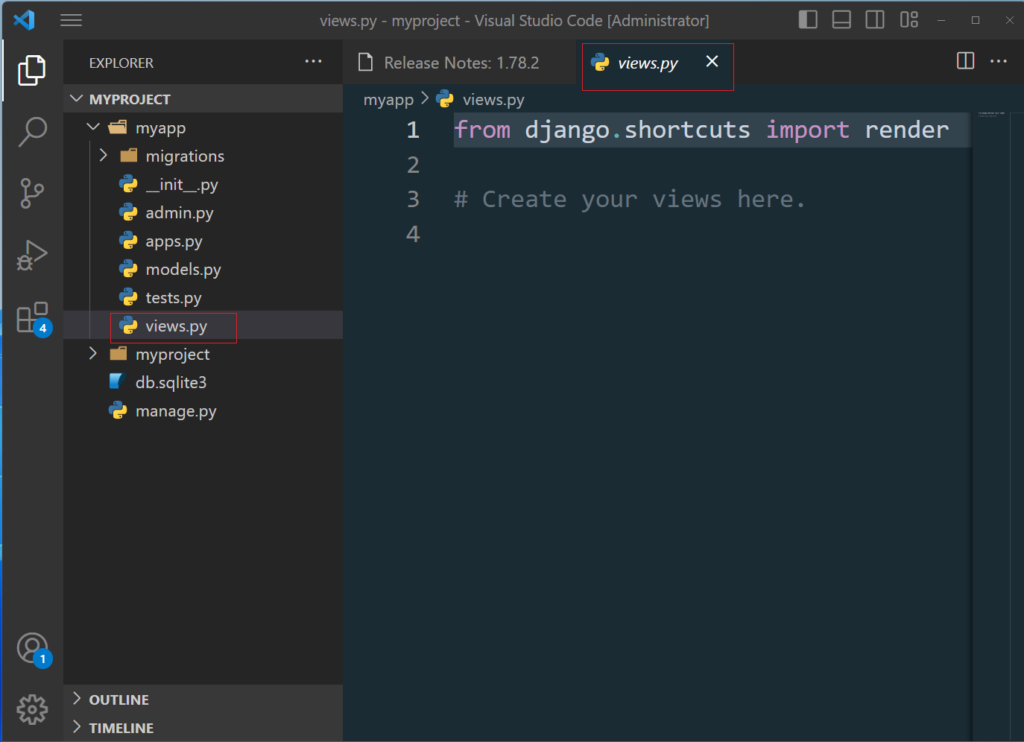
Inside views.py define a function using def keyword , function name can be anything we will call it home. This function should take a request object and returns a response . At the top we have to import HttpResponse class from django.http package .
The name of Views in django is kind of misnomer . Because Views here organize logic of the application , whether templates in django deals with presentation – which is in traditional MVC pattern views do.
But in django, the responsibilities assigned to views align more closely with the Controller in MVC.
Views alone can not define controller’s job , i.e. control the flow of data between data Models and templates but it associates itself with URL patterns which we will discuss next.
The URL patterns and views in Django define the mapping between user requests and the appropriate view functions, handling the flow of data.
Above is a simple example on how to send a response back to the browser. Now let me dig down a little deeper. Take the previous metaphor of the blogging site. Where we have multiple apps – suppose one app named users . For each app we can have multiple views function. It’s a common practice to organize related views in a single views.py file within your app.
In a users app for a blogging website, you might have views for functionalities like user registration, login, profile, and maybe some user-related settings. Here’s the code snippet :
# users/views.py

from django.shortcuts import render, redirect
from django.contrib.auth.forms import UserCreationForm
from django.contrib.auth import authenticate, login
from django.contrib.auth.decorators import login_required
from django.contrib import messages

def register(request):
if request.method == 'POST':
form = UserCreationForm(request.POST)
if form.is_valid():
form.save()
username = form.cleaned_data.get('username')
messages.success(request, f'Account created for {username}!')
return redirect('login')
else:
form = UserCreationForm()
return render(request, 'users/register.html', {'form': form})

def user_login(request):
if request.method == 'POST':
username = request.POST['username']
password = request.POST['password']
user = authenticate(request, username=username, password=password)
if user is not None:
login(request, user)
messages.success(request, f'Welcome back, {username}!')
return redirect('blog-home')
else:
messages.error(request, 'Invalid login credentials. Please try again.')

return render(request, 'users/login.html')

@login_required
def user_profile(request):
# Logic to display user profile
return render(request, 'users/profile.html')

@login_required
def user_settings(request):
# Logic to handle user settings
return render(request, 'users/settings.html')
Next question is : how can we execute the view? Well, we must call the view via a URL.
Mapping URL’s to views :
Create a file named urls.py in the same folder(myapp) as the views.py file. You could call it anything but by convention we call it urls.py. Which maps URLs to your views:
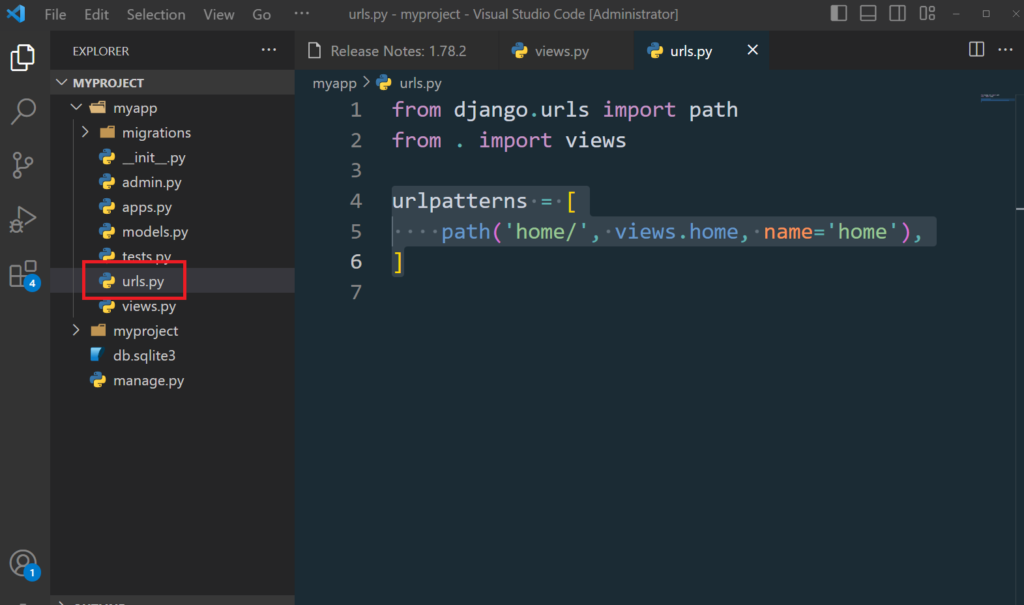
Consider a scenario where you want to access a page at http://127.0.0.1:8000/myapp/home. Then inside urlpatterns list you have to write like this
urlpatterns list,
urlpatterns = [
path('home/', views.home, name='home'),
path('aboutus/', views.aboutus, name='about us'),

path('contactus/', views.contactus, name='contact us'),
# Add other paths for different views as needed
]
1st we have to import path function from django.urls. Also from the current folder we should import views module (from . import views) so that we can reference our view function.
Next we have to define a special variable named urlpatterns all in lowercase. Django will look for this exact variable.
But who will redirect requests to the appropriate app’s urls.py? who says that any URL starting with myapp http://127.0.0.1:8000/myapp/ should be handled by the urls.py in the myapp app ?
myproject/urls.py): It acts as a central hub for all the URLs in your project. The include function is used to include URLs from other apps: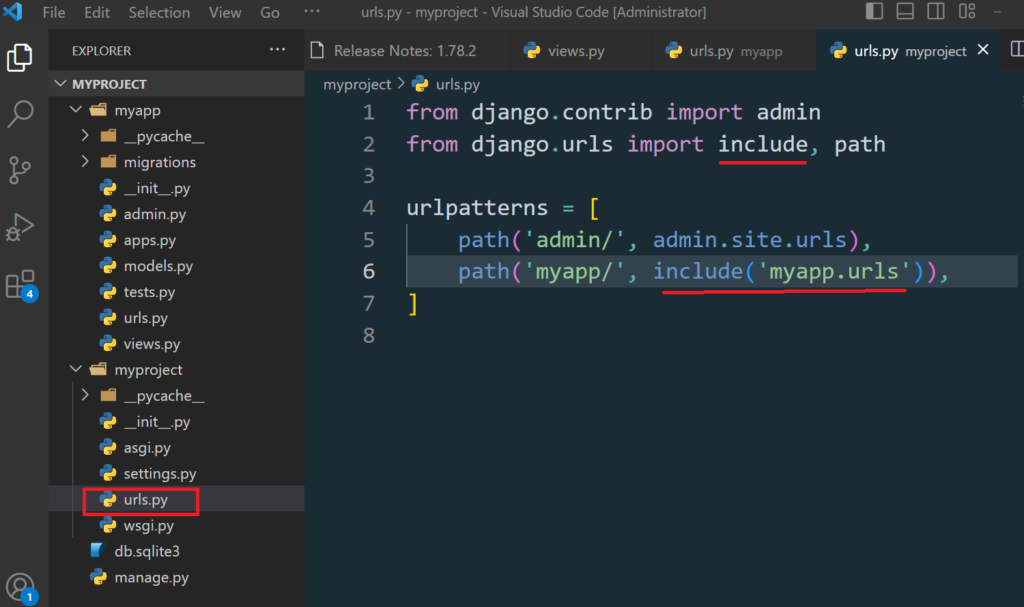
path('myapp/', include('myapp.urls')) says that any URL starting with http://127.0.0.1:8000/myapp/ should be handled by the urls.py in the myapp app.myapp2. Here’s how you can modify myproject/urls.py to include URLs from both myapp and myapp2:
# myproject/urls.py
from django.contrib import admin
from django.urls import include, path

urlpatterns = [
path('admin/', admin.site.urls),
path('myapp/', include('myapp.urls')),
path('myapp2/', include('myapp2.urls')), # Include the URLs from myapp2
# Other app URLs can be included similarly
]
Now, when someone goes to:
http://127.0.0.1:8000/myapp2/, it will be handled bymyapp2/urls.py.http://127.0.0.1:8000/myapp2/home/orhttp://127.0.0.1:8000/myapp2/aboutus/, it will still be handled bymyapp2/urls.py.- Similarly,
http://127.0.0.1:8000/myapp/will be handled bymyapp/urls.py.
This structure keeps your project well-organized and makes it easy to manage multiple apps.
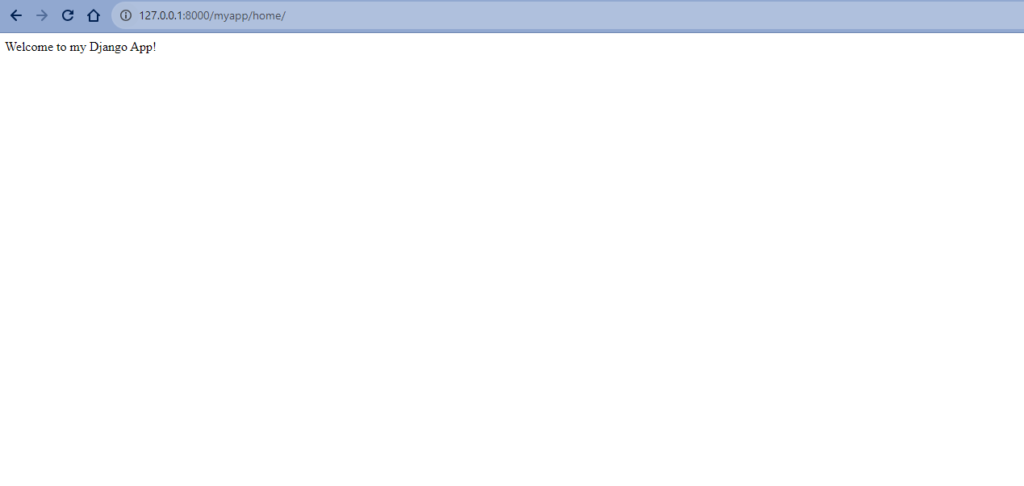
If the server is not running, navigate to the /myproject folder and execute this command in the command prompt: python manage.py runserver
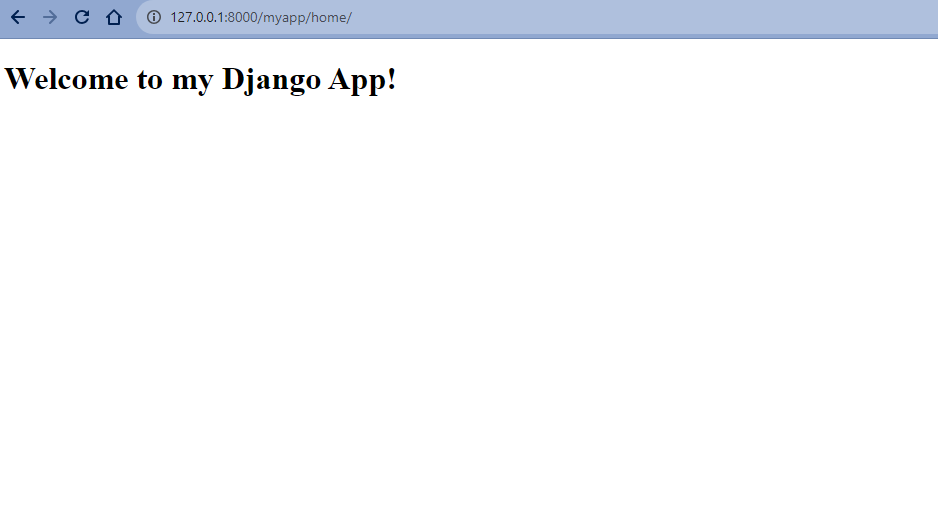
In the browser window, type 127.0.0.1:8000/myapp/home in the address bar.
Creating Templates
I told you earlier in django templates serves the purpose of views like in traditional MVC architecture whether views along with url patterns play the role of controller that is request handler.
Create a templates folder in your app directory (myapp/templates) and add HTML files. For example, create home.html:
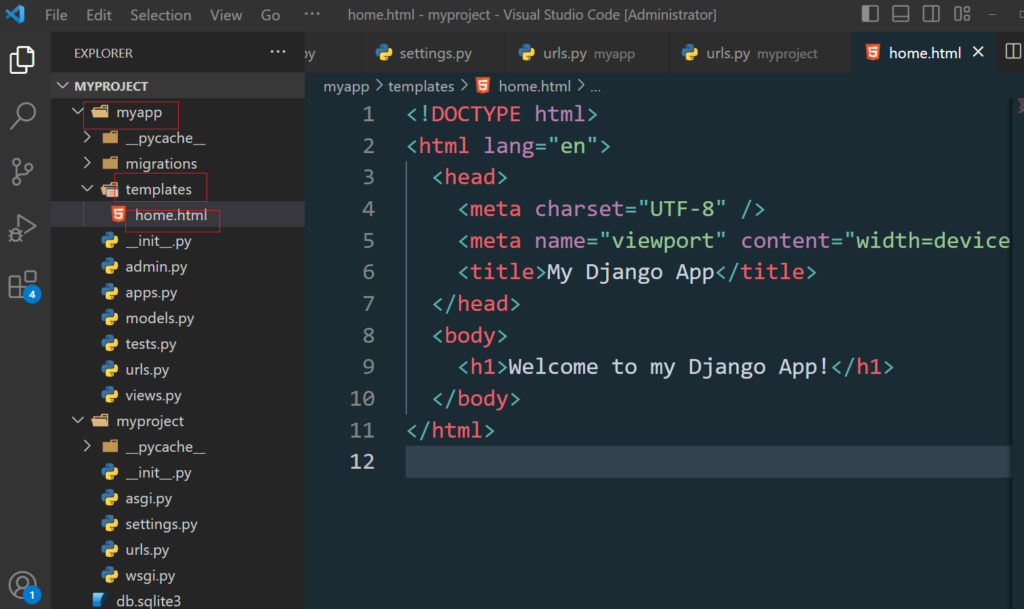
Update your view to render this template:
*** Ensure that your app (
myapp) is included in theINSTALLED_APPSlist inmyproject/settings.py.INSTALLED_APPS = [ ... 'myapp', ]
The result should look like this:
Data Models :
Up until now we have dealt with static data be it through views or be it through templates . In data model we will deal with dynamic data – where data can be stored, retrieved, and manipulated dynamically. Its a fundamental concept in django which helps us to build dynamic and data-driven web applications.
If you are from javascript background you can draw a parallel between Django models and Mongoose schema . Both helps us to provide an abstraction for interacting with the database. Using models , instead of writing raw SQL queries, you interact with objects in Python.
In Django, data is created in objects, called Models, which is actually tables in a database.
Let’s 1st define a Django model named Item in models.py
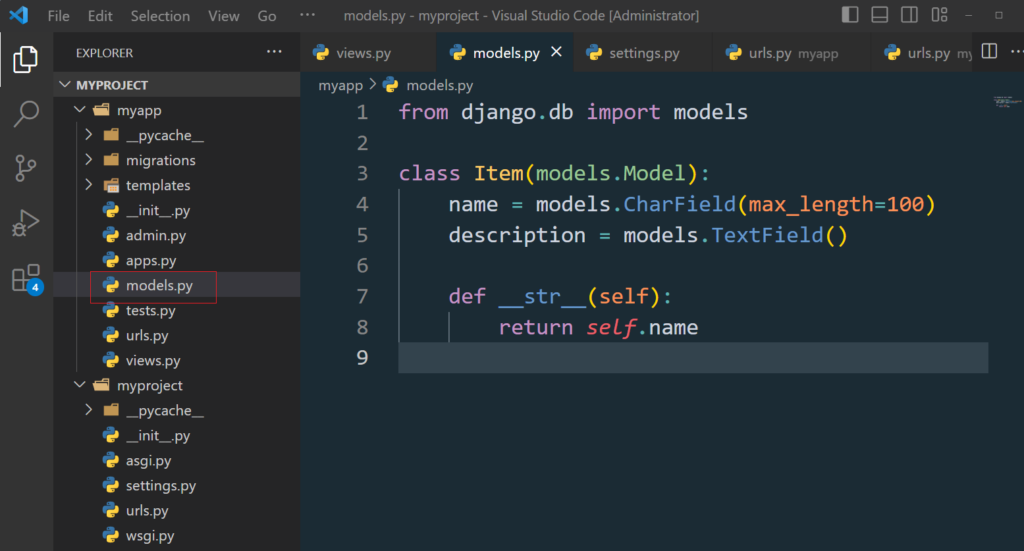
Here Item is the model . I told you earlier Django models map to database tables. In this case, the Item model will correspond to a table in the database.. To add an Item table we have to create Item class, and describe the table fields in it.
name and description Fields: These are fields(columns) of the model(table). CharField is used for short text and TextField for longer text.
__str__ Method: This method returns a human-readable string representation of the object. In this case, it returns the name of the item.
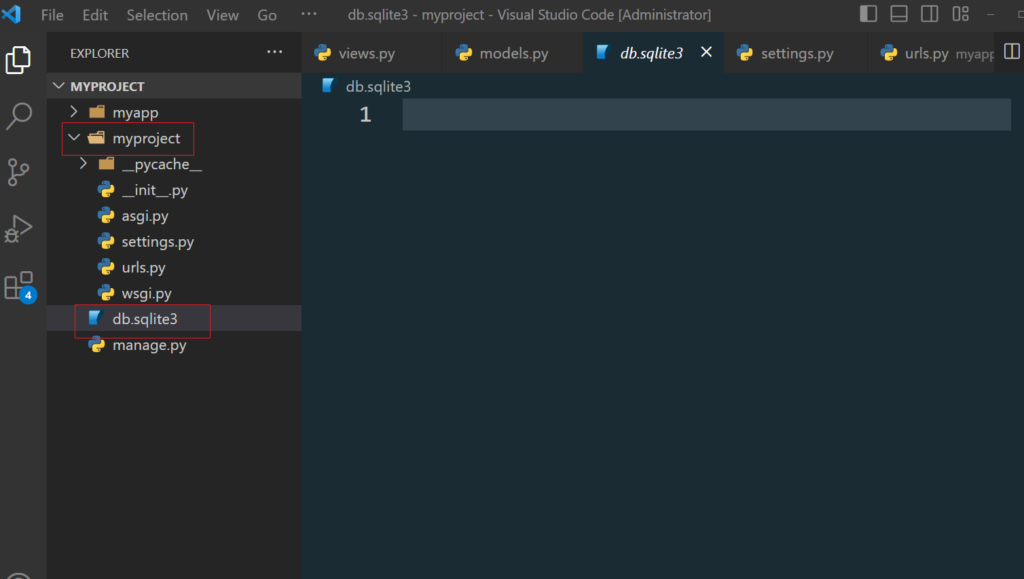
SQLite Database File (db.sqlite3):
By default, Django uses SQLite as its database engine. The db.sqlite3 file in the project’s root folder is where the SQLite database resides.
Migrations:
Now we have described the model in models.py file , next we have to propagate changes that we made to the model (like we have to add new fields namely name and description) into the database schema and actually creating the table in the database.
To do that
Navigate to root myproject folder and run this command:
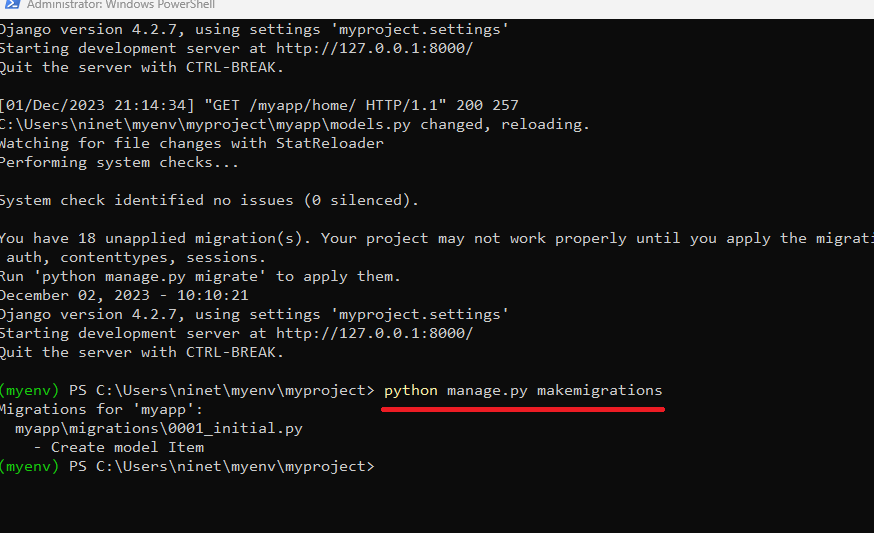
Django creates a file describing the changes and stores the file in the /migrations/ folder:
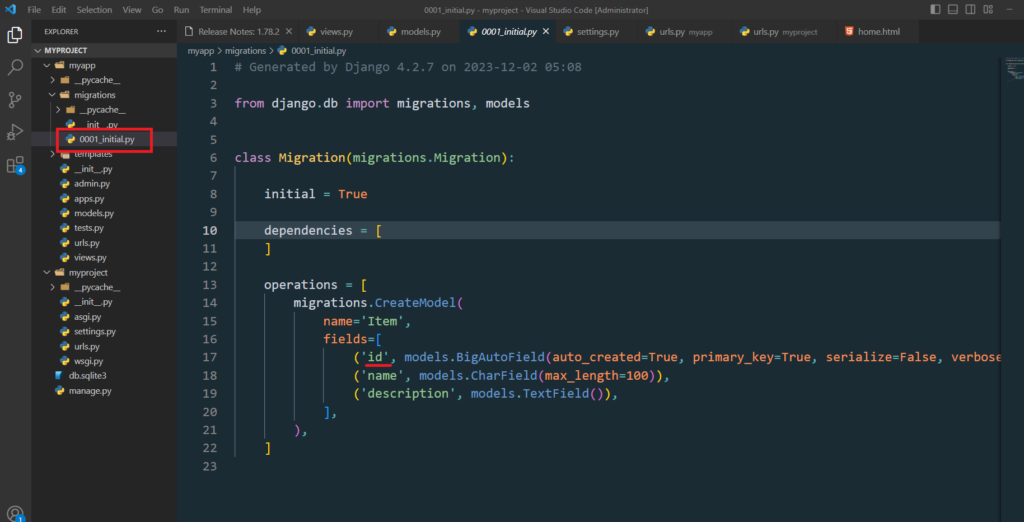
id field for your tables, which is an auto increment number (first record gets the value 1, the second record 2 etc.), this is the default behavior of Django, you can override it by describing your own id field.The table is not created yet, you will have to run one more command, then Django will create and execute an SQL statement, based on the content of the new file in the /migrations/ folder.
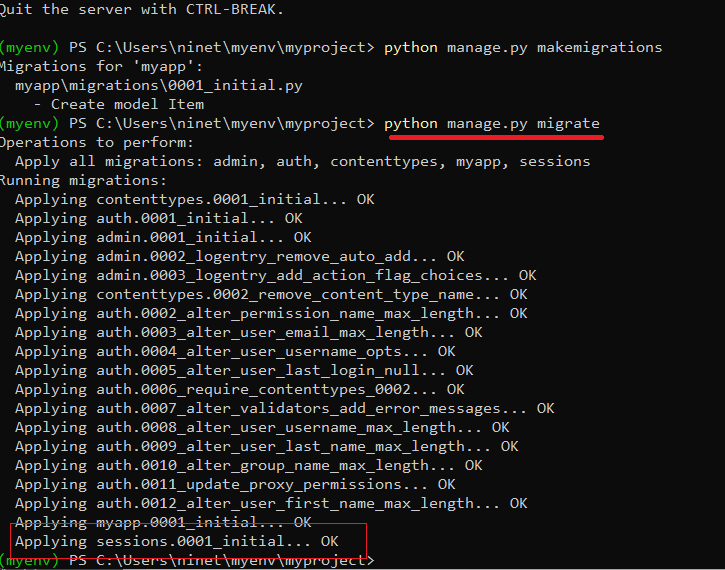
Run the migrate command :
run python manage.py migrate to apply those changes to the database. Please note if you add a new field to Item later, you have to follow the same process to update the database schema.
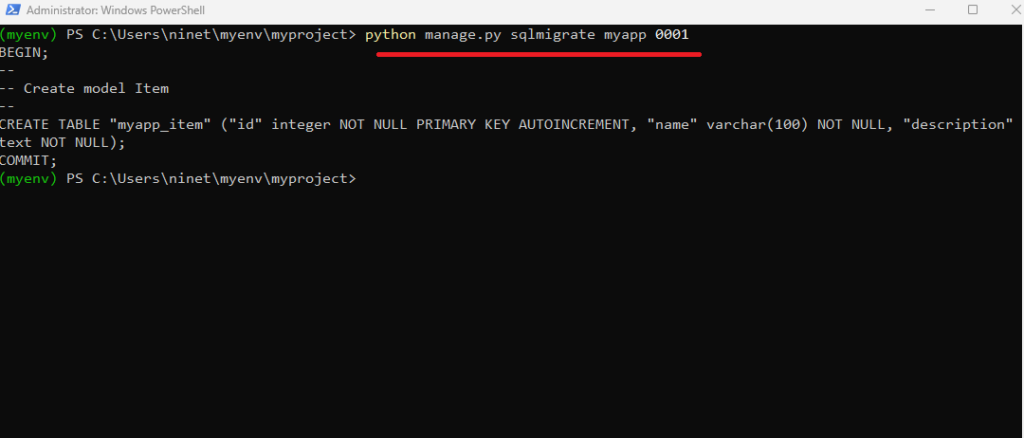
If you want to view the SQL statement that were executed from the migration above. All you have to do is to run this command, with the migration number:
Conclusion :
